Wednesday, June 27, 2012

WIPW: Work-In-Progress Wednesday


This is all you get today of my grannies and ripples! I am about 8 rows and a border away from finishing, and i'm hoping that by next Wednesday i'll have the pattern posted!!

By the way, this was on my bed and I was measuring to find out exactly how long I wanted to make it.... and when this kitty jumped up on the bed, the afghan scared him!! It was way too cute. :)


I have also been working on my other secret project, and i'm just about to a point of a standstill for a little while, so maybe i'll post that one this week too.

But that's it! I've only worked on those two things this week.

I am linking this bad boy up over at Tami's WIP, Ambassador Crochet, Yarn Along, and SusanD's.


Sunday, June 24, 2012

Crochet Symbols

For all those patterns that you absolutely love, but don't know how to make them from the picture.


"Other Craft"

Ready for more of that "other" craft? And yes, I have decided baking/cooking is totally a craft! Because you really need to be skilled to do it well. Ever since I made my strawberry rhubarb dump cake I have been on a strawberry rhubarb kick. I love strawberry rhubarb jam, but never really wanted to spend the money to get it from a farmers market... because $6 a jar seems so expensive! {Well, compared to Smuckers}

So, since i've been on this kick, I thought i'd try my hand at making my own jam. Which is a big feat for me! I like things as easy as possible when it comes to the kitchen. I looked at a ton of recipes, and finally found one that seemed easy enough for me to make, but it didn't include adding actual strawberries. So I played around, and added strawberries! I am in love with my new jam! And... it's so stinking simple!!!


This is the recipe that I made.... Of course you can always cut this in half if you wanted to. This recipe made 3 pint jars and 4 half pint jars. So 5 pints of jam total.


Ingredients
8 cups chopped rhubarb
2 cups sliced strawberries
4 cups sugar
1/3 cup orange juice
2 packages of strawberry jello


Instructions
1. Cut up your rhubarb in to 1/4" pieces and place them in a bowl.
2. Add in the sugar and orange juice, mix it around and let it sit for about an hour.
3. In the meantime, slice up your strawberries and sterilize your jars.
4. When the rhubarb is ready, pour the mixture in a pot. Add strawberries. Cook on medium/high heat, stirring often for about 12-15 minutes - until the mixture is mostly liquid {with a few chunks that make the jam delish!}
5. Remove from heat and add in the packages of jello and stir.
6. Pour the mixture into jars and place them in the refrigerator to settle. Your jam will be ready in a few hours!


See how simple!? And honestly, this tastes just as good as the stuff that takes more time to make. Enjoy your jam!


To add in a little crochet to this post, I've entered a contest over at Not Your Average Crochet to win this prize package. The giveaway ends on 6/26/12.


Saturday, June 23, 2012

Thank you Debi Y!


Today when I went to check the mail, I was expecting a package of something that I had ordered.... however, I wasn't expecting a package from Debi Y from Dly's Hooks and Yarns! In the box from Debi were 6 skeins of yarn! Caron Simply Soft too... which I love!


Thank you so much Debi!! I'm now going to scout out some new patterns to try and get working on a few more baby blankets to donate for the care packages! I'll be sure to post pictures when I finish!

Wednesday, June 20, 2012

WIPW: Work-In-Progress Wednesday


I did not get a lot of crocheting done this week. I was busy helping a friend plan a 30th birthday party for her boyfriend, Fathers Day we spent the whole day out, then on Monday I spent most of my time finishing up 50 Shades Freed.

However, I did get a few rows on my afghan completed!


I also finished sewing on the rest of the granny squares I have from friends and family members. This is all I have right now, and I hope some family members can give me a square or two soon.


And here is my Year Of Scraps project for June {Month #2}! My yarn weighs .50 oz!


Boy, you can't tell what i've mainly been working on, can you?? ;)


I am linking this bad boy up over at Tami's WIP, Ambassador Crochet, Yarn Along, and SusanD's.

You can link up with me if you want!


Tuesday, June 19, 2012

My kitty again!

More evidence that my kitty just loves the Granny squares and ripples afghan!

Thursday, June 14, 2012

Baby Blankets


About a month ago I posted about collecting baby blankets for a local mission. It's a mission that hits very near and dear to my heart, and these blankets will go into care packages to be delivered to hospitals.

Thanks to the kind people I work with, and family members, I have already collected a handful of blankets! They range from tiny to big, and are gender specific or gender neutral. Babies are born at different gestational ages, and sometimes a huge blanket would not fit a baby born at 25 weeks.


This blanket is one I've been working on in my spare time. I updated it in a WIPW post a few weeks back. I finished it last night and am very proud. It's one of the smaller blankets, but it can also be stretched.... which is why I like the pattern. The picture really does not do this blanket justice.

I found the pattern at Mini Frippery. It's a fairly simple pattern! I changed the last row, just a tiny smidge.

Row 1: Using this technique of a no chain foundation, 122 dc
Row 2: ch 3, 3 dc in next dc. (ch3, sk next 2 dc, 3 dc in next dc) 40 times. DC in last dc
Row 3: ch 3, (working behind the ch 3 of previous round, 3 Bpdc in 1st dc in 3 dc set, ch 3) 40 times. 3 bpdc in 1st dc in last 3 dc set. Dc in last turning ch of previous row.

Repeat row three until desired length

Last row: ch 3, (dc in next 3 dc, dc in ch 3 sp ) repeat to the end of the row. Dc in last turning ch. fasten off and weave in ends.


Here is a blanket a friend made.


I absolutely love the detail of this blanket!! I must ask her for the pattern, because it is just beautiful. It is worked in a round, but a rectangular round. It's just beautiful.


Here's one blanket that a co-worker made.

Very simple, and yet beautiful! These blankets are going to be such a nice touch to the care packages. Something hand made with love, in memory of all babies in heaven.


Here's another blanket a co-worker made.

Again, so simple and beautiful!!


And this blanket, I actually made for my nephew when he was born. I had to finish it up after his baby shower... and I honestly never got around to giving it to my sister-in-law. Seeing that my nephew is almost 8 years old, I don't think they'll mind if I donate it.

I wish I had put a border around it. But it was my first granny square blanket ever. As small as it is... it took 7 years until I made another one!


I'll be collecting baby blankets for ever to donate, as unfortunately, there will always be families grieving the loss of a baby.

Wednesday, June 13, 2012

WIPW: Work-In-Progress Wednesday


I had to count all of my projects that I have going right now.... just to see how many I have started and haven't finished. I have 6!! I need to finish some of these bad boys up!

For you today, are two of them that I have made progress on since the last time I posted.


The Grannies and Ripples {Take 2} is one of them. Not only did I add on past the grannies from last week, but I added on to the beginning grannies at the bottom. I figured a border before the real border would make it look better. I'm excited that i'm almost half way done with the afghan!

The other thing that I started this week, is my plarn bag! I have been collecting plastic bags, cutting them up and making a ball of plarn for months now. The ball has just been sitting there, so I decided it was about time that I get started on it.


I mentioned to someone that the next one I make I wanted to use only the same color bags.... but the more I look at this, the more i like the variegated look.

I really hope the plarn bag works well! It is a lot slower to work with than regular yarn, and I have also learned that those thicker plastic bags are not good to crochet with! I thought that the thicker bags would hold up better... and i'm sure they will. But they are a pain to crochet with!


I am linking this bad boy up over at Tami's WIP, Ambassador Crochet, Yarn Along, SusanD's and The Crochet Way.

Well, that's what I am working on right now!


Tuesday, June 12, 2012

10" Square

Who is the biggest project starter in the world!??! Well, I'm sure there are others worse than I am, but I have to be up there on the list.

I started a new afghan. It's actually a practice one, before I make the one that will really mean something special to me. I actually kind of want to make it a secret new project too... until i'm at least part way finished with it.

But, in this new afghan I do have a new square! It's a 10" square, one of the biggest I have ever made.


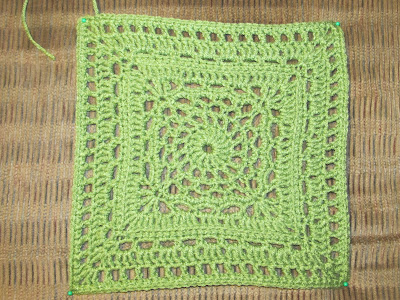
Isn't it beautiful!?? I really hope it looks great with the rest of the blanket once I am finished with it!

To make this 10" Square you need a size H hook.

To Start: Ch 5, join with sl st to form a ring.

Round 1: Ch 3, 15 dc in ring, join with sl st in 3rd ch of beginning ch 3.

Round 2: Ch 4, (dc in next dc, ch 1) 15 times, join with sl st in 3rd ch of beginning ch 4.

Round 3: Sl st in next ch 1 sp. Ch 1, sc in same sp, (ch 3, sc in next ch 1 sp) 15 times, ch 3, sl st in beginning sc. {16 ch 3 sps}

Round 4: Sl st in next ch 3 sp, ch 1, sc in same sp, (ch 3, sc in next ch 3 sp) 15 times, ch 3, sl st in beginning sc. {16 ch 3 sps}

Round 5: Ch 1, sc in same st. (3 sc in next ch 3 sp, sc in next sc) 15 times, 3 sc in last ch 3 sp, join with sl st in beginning sc. {64 sc}

Round 6: Ch 4, (dc, ch 2, dc, ch 1, dc) in same st, *(ch 2, sk next sc, hdc in next sc, {ch 2, sk 3 sc, sc in next sc}twice, ch 2, sk 3 sc, hdc in next sc, ch 2, sk next sc, {dc, ch 1, dc, ch 2, dc, ch 1, dc} in next sc.)*twice, ch 2, sk next sc, hdc in next sc, {ch 2, sk 3 sc, sc in next sc}twice, ch 2, sk 3 sc, hdc in next sc, ch 2, sk next sc, join with sl st in 3rd ch of beginning ch 4.

Round 7: St st in next sts until ch 2 sp in corner, ch 3, (dc, ch 2, 2 dc) in same sp, *(dc in next dc, dc in next ch 1 sp, dc in next dc, {2 dc in next ch 2 sp, dc in next st}4 times, 2 dc in next ch 2 sp, dc in next dc, dc in next ch 1 sp, dc in next dc, {2 dc, ch 2, 2 dc} in corner ch 2 sp)*twice, dc in next dc, dc in next ch 1 sp, dc in next dc, {2 dc in next ch 2 sp, dc in next st}4 times, 2 dc in next ch 2 sp, dc in next dc, dc in next ch 1 sp, dc in next dc, join with sl st in 3rd ch of beginning ch 3.

Round 8: Sl st in next dc and into ch 2 sp, ch 1, (sc, ch 2, sc) in same sp, *(sc in back loop only of each dc across, {sc, ch 2, sc} in next ch 2 sp)*twice, sc in back loop only of each dc across, join with sl st in beginning sc.

Round 9: Sl st into corner ch 2 sp, ch 1, (sc, ch 2, sc) in same sp, *(ch 3, sk 2 sc, sc in next sc)8 times across, ch 3, sk 2 sc, (sc, ch 2, sc) in corner ch 2 sp)*twice, (ch 3, sk 2 sc, sc in next sc)8 times across, ch 3, sk 2 sc, join with sl st in 3rd ch of beginning sc.

Round 10: Sl st into corner ch 2 sp, ch 3, (dc, ch 2, 2 dc) in same sp, *(3 dc in each of next 9 ch 3 sps, {2dc, ch 2, 2 dc} in corner ch 2 sp)*twice, 3 dc in each of the next 9 ch 3 sps, join with sl st in 3rd ch of beginning ch 3.

Round 11: Sl st in next dc and into corner ch 2 sp, ch 3, (dc, ch 2, 2 dc) in sampe corner sp, *({ch 1, sk next dc, dc in next dc}15 times, ch 1, sk next dc, {2 dc, ch 2, 2dc} in cornerch 2 sp)*twice, {ch 1, sk next dc, dc in next dc}15 times, ch 1, sk next dc, join with sl st in 3rd ch of beginning ch 3.

Round 12: Sc in each st and each ch 1 sp around, with 3 sc in each corner ch 2 sp, finish off.


The original inspiration came from YarnCrazy. The one she made was a 12" square, and I didn't want one that big. So I tweaked it to make it a 10" square.


Saturday, June 9, 2012

Dump Cake

So this is where the "other crafts" part plays into my blog. Most of this blog is crochet and knitting, and the "other crafts" part are for all of the other little things that I do. Like scrapbooking... and now, baking. Yes, baking can be considered a craft, right? Well, who really cares! I'm posting it anyways! Tonight, I was in the mood for some dump cake!! It's so stinking simple, and easy!


Anything that has anything to do with Strawberries and Rhubarb put together, I am ALL over! I just love it! Now please know, I didn't really measure at all for this. It's pretty hard to mess this up.


5-6 Stalks of Rhubarb
Strawberries
Sugar
Strawberry Jello
Water
Yellow Cake Mix
1/2 Cup Butter

Preheat oven to 350.

1. The very first thing you do is cut up your stalks of rhubarb and strawberries. There's no specific amount here. I filled up the bottom of my 9 x 13 pan with an even amount of both. You do not want it too be too heaping, but you don't want to see much of the bottom of the pan either.


2. I took two handfuls of sugar and sprinkled it evenly over the top of the strawberries and rhubarb. Then sprinkle the whole package of Strawberry Jello over top of the mixture as well. Then add in about a cup of water, pour it over the mixture in the pan.


3. Finally sprinkle the entire package of the yellow cake mix. Be sure to cover every bit of the pan. If you're using stick butter, I cut it up into slices and place it over the cake, evenly, of course.


And you're done! It bakes at 350 degrees for about an hour. I usually start checking to see how brown it is at 45 minutes, but it normally is perfect after 60. Let it cool for about 30 minutes before serving.

It's so good alone, or with ice cream!

The dump part is a lot like a crisp, but not as crispy... and a lot easier! I'm all about easy!


Remember, I mentioned I made two dump cakes tonight? The other one is a Cherry Pineapple Dump Cake! This one is even simpler than the Strawberry Rhubarb one!


1 Can Cherry Pie Filling
1 Can Crushed Pineapple
Yellow Cake Mix
1/2 Cup Butter

1. First you mix together the can of pie filling and pineapple in your 9 x 13 pan. You can mix it up a lot, or a little, that is all up to you. Just make sure it is spread evenly throughout the pan.


2. Sprinkle the entire package of the yellow cake mix. Be sure to cover every bit of the pan. If you're using stick butter, I cut it up into slices and place it over the cake, evenly, of course.


And you're done! It bakes at 350 degrees for about an hour. I usually start checking to see how brown it is at 45 minutes, but it normally is perfect after 60. Let it cool for about 30 minutes before serving.

It's so good alone, or with ice cream!

This recipe is prefect for the last minute parties, or just an easy {and cheap} desert for dinner!

Wednesday, June 6, 2012

WIPW: Grannies and Ripples {Take 2}


I love the part of an afghan where you can really see it, finally, coming together! Well, ladies and gents, this is that moment.


Taking a picture of it was hard. I had to stretch it out to show all of its glory, and finding a good spot to lay it all out straight like that was hard. So even though it fits the width of my chair right now... that is only how long it is. :) I still have a lot more to crochet, but i'm finally starting to picture what it'll look like when it is finished!

I cannot wait!

Oh, and my kitty says hello!


I am linking this bad boy up over at Tami's WIP, Ambassador Crochet, Yarn Along and The Crochet Way.


Related Posts Plugin for WordPress, Blogger...