Sunday, September 30, 2012

Crochet Along Mini


I cannot believe it's been 9 days since I last posted, and 9 days since the beginning of our Mini Crochet Along started!

I'm very happy to have gotten a few people who made this project! I think the Tic-Tac-Toe Dishcloth is super cute and I hope those who made it enjoy it!

Here's is my version of the dishcloth:


I love the pinks in Debi Y's version! As well as how she weaved in the long strips.


JulieWine from my ravelry group made a very beautiful version as well, and she too weaved in her long strips differently than mine. I think it looks very creative this way!


Thank you all for the help and feedback with my pattern! Like I had said, it is a modified version of the pattern and I did my best to alter it to best fit what I made. I kind of hurried through the alterations of the pattern, so I did make some errors, and I appreciate everyone who offered the feedback. I'm sorry for any frustrations I may have caused.
Friday, September 21, 2012

Crochet Along Mini


This Crochet Along is a mini one, because this is a very quick and easy project! It's a simple dishcloth!


This dishcloth is a modified version of Ocean Weave Crochet Dishcloth. A friend had made this, and it ended up looking more like a placemat than a dishcloth! She sent me the link and I knew I had to modify it to make it smaller. I am nicknaming my version Tic Tac Toe Dishcloth. :) It's about 9.5" by 8".

So this is our crochet along for the moment! You can check out the pattern for it here.

I'll check to see how everyone is doing in a week, and then i'll make a reveal post on the 30th of September!

Have fun everyone!! Don't forget to join the ravelry group if you're on there! I have a discussion going for the mini CAL and the regular one!


If you instagram, use the hashtag #simplycrochetcrochetalong if you take any photos of your progress!

Tic Tac Toe Dishcloth

This dishcloth is a modified version of Ocean Weave Crochet Dishcloth by Wendi Cusins and Maggie Weldon.


I used a worsted weight cotton yarn and a size H hook.
DISHCLOTH
To Start:
Ch 36
Row 1: Dc in 4th ch from hook (counts as first dc), dc in next 8 ch, [ch 2, skip next 2 ch, dc in next 10 ch] 2 times.
Rows 2-4: Ch 3, turn, dc in next 9 dc, [ch 2, sk next 2 chs, dc in next 10 dc] 2 times.
Row 5: Ch 5 (counts as first dc and ch 2), turn, [skip 2 sts, dc in next dc, ch 2] across, ending with dc in last dc.
Row 6: Ch 3, turn, {2 dc in ch-2 sp, dc in next dc} 3 times, [ch 2, skip next ch-2 sp, dc in next dc, {3 dc in ch-2 sp, dc in next dc}3 times] twice.
Rows 7-11: Rep Rows 2-6 once.
Rows 11-14: Rep Rows 2-4 once.
At the end of Row 14, finish off and weave in ends.

STRIPS {Make 4}
- Ch 30, working in BLO, dc in 4th ch from hook, [dc in next ch] across

FINISHING {use photo as guide}
- With right sides of dishcloth and strips facing, weave strips through center open blocks.

EDGING
You can make any style edging you want. In the picture above I did two rounds of sc. Be sure to weave both the strip and the dishcloth together while edging.


Crochet Along - Let's Begin!


Welcome to my very first crochet along! I am very excited as this is my very first CAL ever, that is hosting or participating. Are you nervous yet? Maybe after you hear what the project is...

I originally was thinking something small, something very small. A dishcloth to be more exact. Something I watched someone whip up in 30 minutes. {Which I decided to start a mini-crochet-along as well} Then, as I started searching around on pinterest, oh yes pinterest, I found a beautiful throw! Throw measures approximately 38" wide x 50" long and will use approx. 2004 yards of yarn. I know, this is not small at all! What am I thinking? To be honest, i'm thinking I needed an extra throw for a Christmas gift for my niece.

So what do you think? Are you up for the task? Well, maybe after you see what the throw looks like you might change your mind. For good, or worse.


It is called Earthbound Throw and it is by Bernat.

The pattern can be found through either link. However, I also made a printable version of the pattern that is 4 pages long. You can grab that PDF here.


A hefty CAL isn't it? I just think it's absolutely beautiful and I cannot wait to see all of the different color combinations for this!

There are 5 sections of this blanket, let's make a time frame of 2 weeks per section, plus one week to gather supplies. So let's say November 30th (for now) is the current deadline to finish the throw! That's perfect timing for Christmas! Of course, the time frame is not set in stone, so don't freak out on me!


Please leave any questions or feedback in the comments here and I'll get back with you! For all of you on Ravelry, I have also started a group there for easier communication!

Let's get going!!

If you instagram, use the hashtag #simplycrochetcrochetalong if you take any photos of your progress!

Tuesday, September 18, 2012

CAL?


I've always wanted to join in on a Crochet Along... but I can never seem to find one when they are first starting off.

So, I know I don't have many followers, but if I started one, who would be interested?

I'm not sure what the project would be, something small.

So either comment with if you are interested, or comment if you know of a CAL just starting up. Thanks!!

Tuesday, September 11, 2012

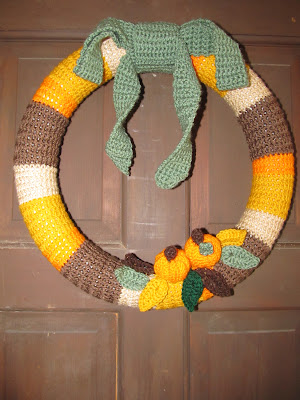
Crochet Autumn Wreath

While searching around on pinterest, I found this lovely wreath by Sarah at Repeat Crafter Me.


I fell in love with it and knew immediately that I had to make it! So, I went right out and grabbed the materials and started to make my version of this Autumn Wreath!

I started with the typical materials, worsted weight yarn (I had to buy the pumpkin orange, all of the other colors I had in my stash), a foam wreath, my hook and my tapestry needle.


Sarah used a Size H Crochet Hook, I decided to use a Size I hook. Thinking that i'd have to crochet less than her beginning chain, I did a couple of rows to test my width, and found that a starter chain of 26 was perfect.

I chained 26, and started my row of sc in the 2nd chain from the hook. So there were 25 sts total across.

My note to self, while a couple of rows made it perfectly fit. In the end it was almost too tight to sew together. I had to really stretch it out. So next time I will crochet a couple of rows and make sure that they overlap around the foam wreath. {You'll see pictures in a little bit}

Also, next time, instead of spending $8 on a foam wreath.. i'm going to try out another deal I saw on pinterest.


I started to crochet my colors; I designated each color a certain number of even rows. 4, 6, 8 and 10 rows. It worked out that I did this pattern 5 times around.


I left long tails on my ends when I changed colors. When it came time to sew the edges together, I just used the tail. Even though you don't see the back, it gave it more of a seamless feel to it!

Once I was finished, and was satisfied that it fit around my wreath, I sewed end to end and placed it around my foam wreath.


Yes, I did run out of the one brown color and I had to use a second brown. I ended up hiding the odd brown under the bow in the end.

And this is where you can notice how much room is left on the other side.


It did stretch to fit when I sewed the ends together... but it was much more difficult than it needed to be. I'm also now wondering if it would have fit better if I continued on with the colors around and not made it such a tight fit that way.


The bow is the only part I am not happy with on this wreath. Sarah said her bow was 6 sc across and about 3 feet long. Once mine hit 3 feet, I could not form it into a bow I liked, so I went longer.

I ended up crocheting another loop, 10 sc wide and long enough to fit around the foam wreath. I sewed the ends together around the wreath, and put the bow in underneath. I will have to find different way to do a bow the next time I crochet a wreath.


Last but not least, I had to make the pumpkins and leaves!

The pumpkin pattern came from Sarah again. Here is her pattern, she has pretty pictures on her site.

Working in back loops only...
Chain 11,
Row 1: SC in second chain from hook, SC in next, HDC in next 6, SC in last two, chain 1, turn
Row 2: SC across (10 SC)
Row 3-17: Repeat rows 1-2. Leave long tail.

Stitch together row 17 to beginning row.

Just like you would begin to make a single crochet decrease, stitch together one end of the pumpkin. Keep looping the tapestry need under two stitches at a time until it closes. Stuff with poly-fil {I filled it with yarn} and do the same to the other side. Fasten off and weave in ends.

Pumpkin Stem:
Magic ring, 4 SC in magic ring,
2 SC in first stitch, SC in next, repeat around (6 sc)
Continue to SC around until stem is to the desired length and sew together.


The leaf pattern came from Wind Rose Fiber Studio. Here is their pattern:

chain 10 leaving 8” beg tail
Side 1: working in back loops of beginning chain, 3 dc in fourth st from hook, dc in next 3 sts, hdc in next st, sc in next st, sl st in last st, ch 1, sl st in ch just made (leaf point made)
Side 2: working down the other side of the beginning chain in the front loops, sl st in next st, sc in next st, hdc in next st, dc in next 3 sts, work 3 dc in next st, join with sl st to top of beg ch 3

Stem: chain 4, sl st in second st from hook and in next two sts. sl st to next dc, finish off weaving in all loose ends

I made them without the stem.


A little hot glue, because I like to cheat like that, and you have the finished product!! How cute is this?! Not my door though, I just used an inside door instead of finding our wreath hanger {which I think is tucked away with our Christmas stuff} so I could show you on our front door.


My mind is thinking of different ways I can make wreaths for Christmas now!
Plus, i'm thinking about using the Random Stripe Generator to help work my way around!

I hooked up with hooking up on hump day!

Sunday, September 9, 2012

Diamonds Are Forever Christmas Ornament Cover


I've actually completed this Christmas Ornament awhile ago, I just never got around to posting it. While I love the way it looks, i'm not a big fan of working it up. This Christmas ornament starts in the middle instead of the bottom, like my others.


You will need size 10 cotton thread, and a size 6 steel hook.

To start: Ch 50, join to form a circle
Row 1: Ch 1, *skip 2 ch, 8 tc in next ch, skip 2 ch, sc in next ch, repeat from * around ending with sc; join with sl st to first ch-1. (8 groups of 8 tc)

Row 2: Sl st to middle of 8 tc group to space between 4th and 5th tc, ch 8, *sc in middle of next 8 tc group, ch 8, repeat from * around ending with ch-8; join with sl st to base of first ch-8.

Row 3: Sl st to middle of ch-8, *ch 10, sc in middle of next ch-8, ch 10, repeat from * around ending with ch-10; join with sl st to base of first ch-10.

Row 4: Sl st to middle of ch-10, sc in middle of each ch-10 catching each loop together; join at first sc. Tie off.

Row 5: BEGIN TOP HALF. Pick up thread between 2 groups of tc, sc in same sp, *8 tc above the 8-tc of the bottom half, sc above sc sp, repeat from * around ending with sc; join with sl st at first sc.

Row 6: Sl st to middle of 8-tc group, ch 6 * sc in top of next 8-tc group, ch 6, repeat from * around ending with ch-6; join with sl st to base of first ch-6.

Row 7: Sl st to middle of ch-6, *ch 6, sc in middle of next ch-6, ch 6, repeat from * around ending with ch-6; join with a sl st at base of first ch-6.

Row 8: Sl st to middle of ch-6, tie off leaving a tail long enough to gather loops, pulling them up and around the neck of the ornament.


Wednesday, September 5, 2012

WIPW: Work-In-Progress Wednesday


Well, it's better late than never, but here is today's WIPW!


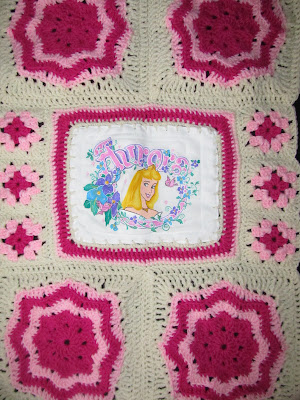
I have part of my blanket pieced together!

I'm taking a break from this though, because I am going to be working on a basket for a benefit. My cousin's son was just diagnosed with SMA and they will be having a benefit at the end of the month. I promised them a basket of crochet goodies to raffle off!


So the first thing I want to put in the basket is a large doily, possible tablecloth, depending on how big it'll actually be once it is done. This is my first doily, and i'm cheating by using two strands of cotton thread instead of one. I tried using one, but I just wasn't liking it.


And the other thing I am working on is a double sided diagonal pot holder!

In which you can also see what book I am reading right now! I usually read off my nook tablet, but I really wanted to read this book, but it's still on hold through the library e-books site. Since we have it in hard copy, I decided to actually read a real book. Let me tell you, from e-books to this, it is much different!!


I am linking up with Tami's WIP, Ambassador Crochet, Yarn Along and SusanD's.

Related Posts Plugin for WordPress, Blogger...