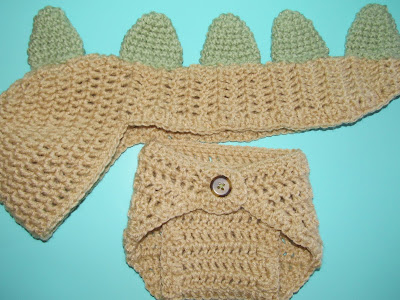
Do you not love the little cabbage patch kid that I put it on?! I needed to get an idea to see if the spikes really did work, and stand up and were positioned well... and I thought, why not put it on the cabbage patch kid?!
I'm really excited about this, and I can't wait to see how it looks on the baby once he is born. I hope that when they take him to get his professional photographs done, it'll look just as cute as the original one at the top.
The pattern I used is from here. I modified it just a tiny bit.
The Newborn Diaper Cover Pattern uses worsted weight yarn and a size H crochet hook.
To Start: Ch 15
Row 1: dc in 3rd ch from hook, dc across remaining 12 sts, turn. {13}
Rows 2-9: Ch 3 (counts as dc here and throughout), dc in each ch across, turn. {13}
Rows 10-13: Ch 3, 2 dc in same ch as the ch 3, dc across, 3 dc in last ch, turn. {On Row 13 - 25sts}
Row 14-18: Ch 3, 1 dc in same ch as the ch 3, dc across, 2 dc in last ch, turn. {On Row 18 - 35 sts}
Row 19: Ch 7 {If you will be using a bigger button, ch more here and at the opposite end}, sl st in 5th ch from hook to form loop, dc in same ch, dc across, 2 dc in last, ch 5, sl st with first ch of ch-5 to form loop, turn.
Row 20: Ch 3, 1 dc in same ch, dc across, 7 dc in ch-5 loop.
Border: At this point, you will sc around the entire diaper cover, starting where the last DC touches the side of the diaper cover. After you have made it to the other ch-5 loop on the other side, 7 dc into the loop and fasten off.
Attach a button to the center of the front.
The pattern I used to help create the spikes can be found here.
The Dinosaur Spiked Hat uses worsted weight yarn and a size H crochet hook.
To Start: Ch 3, sl st in first ch to form ring.
Round 1: Ch 3, dc 11 in ring, sl st in third ch.
Round 2: Ch 3, dc in same st, dc twice in each dc around, join. {24}
Round 3: Ch 3, dc twice in next dc. (dc, 2dc) around, dc in last dc, join. {36}
Round 4: Ch 3, (dc twice in next dc, dc in next 2 dc) around, join. {48}
Round 5-9: Ch 3, dc in each dc around, join. DO NOT FASTEN OFF unless changing colors.
At this point you will be working in rows.
To Start: sl st in the next 10 sts on the hat.
Row 1: ch 3 (counts as first dc here and throughout), dc in next 17 sts, turn. {18}
Row 2-15: ch 3, dc across, turn. {18}
Row 16: ch 3, dc2tog, dc in next 12 sts, dc2tog, dc in last st, turn. {16}
Row 17: ch 3, dc2tog, dc in next 10 sts, dc2tog, dc in last st, turn. {14}
Row 18: ch 3, dc2tog, dc in next 8 sts, dc2tog, dc in last st, turn. {12}
Row 19: ch 3, dc2tog, dc in next 6 sts, dc2tog, dc in last st, turn. {10}
Row 20: ch 1, sc border around the whole project, join by sl st in starting ch 1, fasten off.
To Make Spikes: Start with an adjustable ring.
Round 1: ch 1, 6 sc in ring, join with sl st. {6}
Round 2: ch 1, (1 sc in next, 2 sc in next) 3 times, join. {9}
Round 3: ch 1, 1 sc in each sc, join. {9}
Round 4: ch 1, (1 sc in next 2 sts, 2 sc in next) 3 times, join. {12}
Round 5: ch 1, 1 sc in each sc, join. {12}
Round 6: ch 1, (1 sc in next 3 sts, 2 sc in next) 3 times, join. {15}
Round 7: ch 1, 1 sc in each sc, join. {15}
Round 8: ch 1, (1 sc in next 4 sts, 2 sc in next) 3 times, join. {18}
Round 9: ch 1, 1 sc in each sc, join then fasten off leaving a long tail for sewing.. {18}
Sew your spikes on the center of the hat. I started with the tip of the tail and worked my way up, making each spike as I went along to make sure I didn't make too many spikes.
Edited to add the picture of the little munchkin when he was born!
Pin It


No comments:
Post a Comment