Wednesday, February 29, 2012

WIPW: Work-In-Progress Wednesday - Grannies and Ripples + Newborn Baby Prop


It's that time again!! And yes, I'm still working on that grannies and ripples afghan! I didn't do much this week, maybe 6 rows total. I know, I've been bad! But I had my book club meeting on Sunday and I needed to finish 200+ pages in my book, so I whipped it out and didn't crochet much.


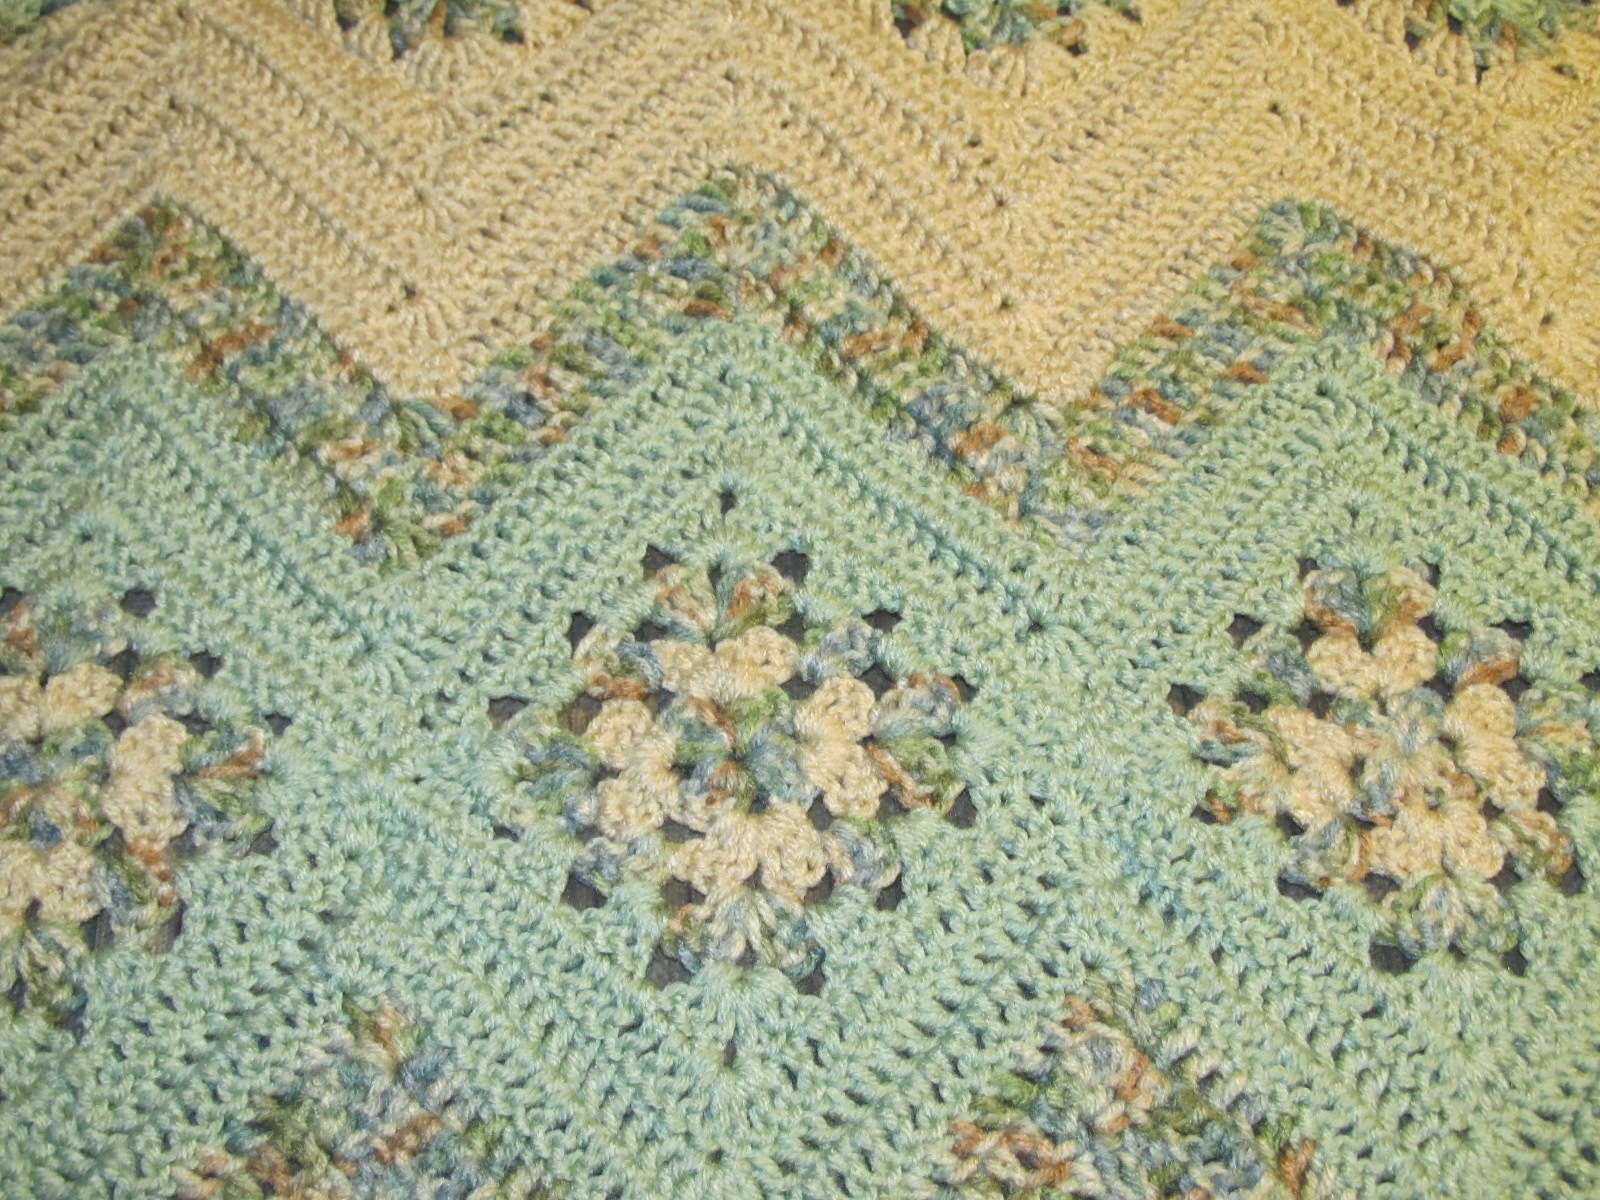
Since I have you all right here looking at my afghan, I need a bit of creative advice. After the first set of grannies {the ones at the bottom of the picture} I worked 3 rows of green, 3 rows of verigated, and 6 rows of beige. Just now, after the 2nd set of grannies {the ones at the top} I worked 6 rows of beige, and i'm going to work 3 rows of verigated.... when I get to the green, should I work in 6 rows or stay with 3? I'm trying to picture what it would look like in my head with a bigger stripe of green. I think it'll look fine at the ends, but i'm not sure if the smaller stripe of green in the middle will still look okay. So what do you guys think? Remember, that green that i've already made is the middle of the afghan. What I am doing to this side I am going to mirror on the other side.


I also started working on another project for my cousin. She asked me if I could make her something like this for her baby after he's born.


So, I thought i'd give it a try! I did finish the diaper cover... so here's a sneak peak at that. Sorry, I know, something finished is in the work-in-progress post!! What a horrible thing!!! ;)
However, I can say that the hat is still a work-in-progress!! I need to make and sew on about 5 or 6 more of these spikes, and then it should be finished! I hope that it looks as cute as the one in the picture above does.

If you notice, I am using the same colors as the grannies and ripples blanket. When asking my cousin about the colors she wanted, I showed her the grannies and ripples blanket and she loved the beige and green in that! So there we are. I can't wait until it's all finished!

I'm am linked up at Ambassador Crochet and Yarn Along.

I love the idea of having a link up of my own, because I love looking at others projects. So please feel free to link up with me too! No need to grab a button or say you did.


Sunday, February 26, 2012

Towel Holder


These towel holders are very different than the towel toppers that I used to make before. With those towel toppers, you have to wash the whole thing. But with this type of towel holder, you can remove the towel and replace it right away with a new one.


The pattern for this is super simple too!

You'll need a ponytail holder, yarn and a button. For this example pictured, I used strands of 10 cotton thread. You can also use a thicker cotton yarn as well as worsted weight yarn. There will be a difference in the number of rows that you complete. You want to make sure it'll wrap around the desired place.


To Start: Join with sl st around ponytail holder, ch 1, sc as many times needed around the ponytail holder, join with sl st in first sc.
Row 1: ch 2 (counts as 1st hdc here and throughout), hdc in next 9 sts, turn.
Continue this pattern, working 10 sts across until your piece is at a desired length. I usually work 12-15 rows before adding the button hole.
Button Hole Row 1: ch 2, hdc in next 3 sts, ch 2, sk next 2 sts, hdc in next 4 sts, turn.
Button Hole Row 2: ch 1, sc in next 3 sts, 2 sc in ch 2 sp, sc in next 4 sts, turn.
Finishing Row: ch 1, sc across.
Border: ch 1, sc around the border of the towel holder, sl st into beginning ch 1, fasten off.

Sew on your button and you're done!

NOTE: The red/pink towel holder is not pictured with a border. If you'd like to see what it looks like with a border, click here.

After playing around with these for a little bit, you can change up the width of the project to fit your needs. My aunt makes these and she dc around the ponytail holder instead of sc. I also know people who make something similar and add a border around the whole project. So really you can do anything to this to fit your needs or your style!

Just remember, the bigger the ponytail holder, the bigger towel you'll be able to fit in there. This pictured is a smaller holder, so the kitchen towel is quite small. I would not be able to fit a towel like I used in my towel toppers post with this. Some people use 2" plastic rings, but honestly, I cannot find plastic rings anywhere anymore!

Enjoy your new towel holders!
Pin It

Friday, February 24, 2012

FOF: Finished Object Friday - Pot Holder and Towel Holder


Just recently I finally finished the final piece of my "cheap purple cotton thread" project. Last week I finished the pot holder to add to the knitted dish cloth. And this week I finished the kitchen towel holder to go along with it. Yes, it is the same color purple! It's so hard to get a good picture of these projects and capture their true color.

I haven't written a pattern for the towel holder yet, I should do that soon! They're so quick and easy to make and are perfect gifts for people. Especially those who you have no idea what to buy for.

Since the purple thread gift set is finished now, I started working on a new set of kitchen fun! This one I am using the size 10 cotton thread. This particular one is using one thread of Red Heart and one thread of Aunt Lydia's.


So along with the towel holder, I also made one of the pot holders that I just blogged about the other day. I actually messed up on this pot holder, which is why I didn't add a fancy edging to it. But it also shows you what one looks like plain.


Did you finish something this week? I would love to see it! It doesn't need to be a FOF... but as long as you blogged about it, link up with me here! For name, put the name of your project! I'm linked up over at Tamis.


Wednesday, February 22, 2012

WIPW: Work-In-Progress Wednesday - Grannies and Ripples


I've come a long way since last Wednesday on my grannies and ripples afghan! The grannies on last week's are going to be the center of the blanket and i'm working it in a symmetrical pattern on each side.


After I finish a few rows of the beige on the end, i'll add a row of grannies to the opposite end and work from there for a bit. It's turning out so nice though!


I am linking this bad boy up over at Tami's WIP, Ambassador Crochet, and Yarn Along.

I love the idea of having a link up of my own, because I love looking at others projects. So please feel free to link up with me too! No need to grab a button or say you did.


Tuesday, February 21, 2012

Double-Sided Diagonal Pot Holder

Growing up my grandmother always made these pot holders. They were the ones she always used at her house, and since she gave my family a lot of them, they were the ones we always used at our house too. I am finally getting around to making some of my own!


This pattern doesn't require careful concentration, so this is a perfect thing to make while watching your favorite TV Show!

This is made with 2 strands of Aunt Lydia's 10 thread. You also need a 1" plastic ring and a size E aluminum crochet hook. Gauge is not particularly important.


To Start: Attach yarn to plastic ring with sl st and work approx. 26 sc to fill ring, join in front loop only with sl st. DO NOT TURN.
Round 1: ch 3 (counts as first dc this and every time), working in front loops only, dc in each of next 4 sc, ch 2, dc in each of next 5 sc; turn, working in free loops {back loops} behind stitches just worked dc in each of next 5 sc, ch 2, dc in each of next 5 sc, join with sl st in first dc, turn.
Round 2: ch 3, dc in each of next 4 dc, in ch-2 sp work 2 dc, ch 2, 2 dc; dc in each of next 10 dc, in ch-2 sp work 2 dc, ch 2, 2 dc; dc in next 5 dc, join with sl st in first dc, turn.
Round 3-15: ch 3, (dc in each of next dc until ch 2 sp, in ch-2 sp work 2 dc, ch 2, 2 dc) twice, dc in each of next dc ending row with sl st in first dc.
Round 16: ch 1, working through both loops of stitches in front and back row, sc in first stitch, ch 3, sl st in sc just made {picot made}, (sc in each of next 2 sts, ch 3, sl st in sc just made) repeat for a total of 17 picot before corner. In corner sp work 2 sc, picot, 1 sc, sc in next dc, work picot, (sc in each of next 2 sc, picot) repeat until 17 picot are made, sc in last stitch and end off.

Pin It

Despicable Me Minion Crochet Hat

My cousin had professional photos done of her son in the Despicable Me Minion Crochet Hat I crocheted for him! He looks so stinking cute!!


Seeing it on his head nicely here, it looks like I could have added an extra row or two, so i'll edit my original post about it. But how cute is he??

Friday, February 17, 2012

FOF: Finished Object Friday - Hot Pad/Pot Holder


So along with WIPW, to help keep me blogging a little more on my projects, I decided to start up a Finished Object Friday. For the weeks that I actually finish something, i'll post it on FOF. :)


This project I actually just finished today. It is a pot holder or hot pad, depending on what you call it. It's made from a simple, plain colored, cotton thread. My grandmother actually gave me a ball of this thread that she got at a dollar store, 2 for $1.

I am getting a head start on these to give away as gifts next holiday season. So far with this set, I have also knitted the dish cloth. I plan on making one more thing out of this purple yarn!


Did you finish something this week? It doesn't need to be a FOF... but as long as you blogged about it, link up with me here! For name, put the name of your project! I'm linked up over at Tamis.


Wednesday, February 15, 2012

WIPW: Work-In-Progress Wednesday - Grannies and Ripples


I found a very cute pattern for a baby blanket over at Caron Yarn. However, I do not need to make any more baby blankets for anyone! Shocking, isn't it? So I decided to tackle an afghan. I have yet to decide if this is one for me, or if I will give it away as a gift. However, it'll probably be a gift as I have a million and one afghans!


I started it just this past weekend, and am shocked on how far I have got so far! I am not following the pattern to a T, but I really hope it turns out well. If not, then I know to follow the pattern for another one if I choose to make it.

I am linking this bad boy up over at Tami's WIP, Ambassador Crochet, Yarn Along and The Crochet Way.

You may also link up with me below. :)


Saturday, February 11, 2012

Circle Gets the Square preemie baby blanket

My cousins son was born 9 weeks premature. He is such a little tiny thing and he's finally home from the hospital. I wanted to make her a blanket that would fit his current size. I knew he would be getting a lot of blankets that were way too big, but I think this one would be perfect for the little snuggles now.


I made two separate types of squares and joined them together the way I joined these together.

For the border, I added a granny style all of the way around. I ended up doing 4 rows around my squares.


The first square I made was this one below, the original pattern came from here.
Special Abbreviations
FPdc (Front Post double crochet): Yo,
insert hook from
front to back to front around post of indicated st; yo and
draw up lp, [yo and draw through 2 lps on hook] twice.

To Start: Make an adjustable ring, ch 3.
Round 1: 11 dc into ring, join {12}
Round 2: Ch 3, FPdc around same dc as join, (dc in next dc, FPdc around same dc) repeat 10 more times; join {24}
Round 3: : Ch 3, dc in next st, FPdc around same FPdc, (dc in next 2 sts, FPdc around same FPdc) repeat 10 more times; join {36}
Round 4: Ch 3, dc in next 2 sts, FPdc around same FPdc, (dc in next 3 sts, FPdc around same FPdc) repeat 10 more times; join and fasten. {48}
Round 5: sl st into any sp, ch 3, 2 dc into same sp, ch 1, 3 dc into same sp, ch 1, (sk next 4 sts, 3 dc in same sp, ch 1, sk next 4 sts, 3 dc, ch 1, 3dc in same sp) around, join and fasten.


The second square I made was this one below, the original pattern came from here.
To Start: Make an adjustable ring. Ch 3
Round 1: dc into ring, ch 1, (yarn over, insert hook, yarn over, pull the loop back through the stitch (three loops on hook), yarn over and pull through two loops on hook (two loops left on hook), yarn over and pull through remaining two loops, ch 1) 7 times, join and finish.
Round 2: sl st into ch-1 sp, ch 3, 2 dc into same sp, ch 1, (3 dc in next ch-1 sp, ch 1) around, join and fasten.
Round 3: sl st into ch-1 sp, ch 3, 2 dc into same sp, ch 1, 3 dc into same sp, ch 1, (3 dc in next ch-1 sp, ch 1, 3 dc into next ch-1 sp, ch 1, 3 dc into same sp) around, join and finish.
Round 4: sl st into ch-1 sp, ch 3, 2 dc into same sp, ch 1, 3 dc into same sp, ch 1, (3 dc in next ch-1 sp, ch 1, 3 dc in next ch-1 sp, ch 1, 3 dc into next ch-1 sp, ch 1, 3 dc into same sp) around, join and finish.


Pin It

Granny Squares for Cancer

Hello my lovely followers! I know there are not many of you, but I was wondering if any of you knew of a place I could send granny squares? Then this person would turn around and make then into an afghan to kids with cancer?

Not that long ago I found Share A Square.


I fell in love with the idea! However, I found this site a few days after her last request date. Then yesterday, she sent out a message saying that she's done making the blankets for good.

I still want to do this though, I want to make squares for kids with cancer! Do you know of another site or person who is doing the same thing? I found other sites that are making blankets for other reasons, but this specific reason really touched my heart.

Please say you know of a site. Because honestly, I'm thinking of having people start sending squares to me and i'll just make the blankets!
Related Posts Plugin for WordPress, Blogger...