Saturday, July 28, 2012

Knit Christmas Stocking

This here is the only reason I learned how to crochet over 10 years ago. My grandmother made these for every family member, and is still making them today.


It was over 10 years ago that she started guilting us a little bit about who was going to make the stockings after she was gone. Since grandma crocheted everything, I started to learn how to crochet.

A year later I told her I was ready to learn how to make the stockings, however, I learned then that she knit the stocking.

Nine years later I learned how to knit.

Now 6 months after learning how to knit, I finally made what I had set out to make over 10 years ago!!


I am so proud of my stocking!! I saw someone selling something similar to these on Etsy for $50!! If only they didn't take so many man hours to make. Maybe the next one I make i'll break out my stop watch to figure out exactly how many hours it takes.


The pattern came from an old kit that my grandmother bought many many many years ago. If I had to guess, I'd say about 30 years ago. The directions are so tattered, torn, faded, and the paper is even now brown! I have no idea where the pattern is from, who made it, or even if something similar is still available. All I have are a photocopied version of her pages.

I am thinking about taking the pattern, and just changing up the chart a little bit. Maybe make a blue stocking with snowflakes?

I know for my family, I can never stray from the original design... seeings that everyone in my family has it!

However, for my husbands family, I might experiment!

Wednesday, July 25, 2012

WIPW: Work-In-Progress Wednesday


I learned how to crochet because of my grandmother. She makes Christmas Stockings for the whole family, and we love them! So one day she mentioned, "Who's going to make these stockings after I die?" ... so I learned how to crochet about 10 years ago.

When I finally thought I was good enough to learn how to make the stocking, I came back to my grandmother to tell her I was ready. Only to have her say, "Oh, I don't crochet those. I knit those. The stockings are the only thing that I knit."

I tried to pick up knitting, but had no luck. Then when I picked it up again this December, I knew I had to put my heart and soul into knitting. Sunday afternoon, I finally decided that I needed to get my act together and attempt the stocking! It's new concepts that I have yet to try, but I needed to give it a go.

So, this is my Christmas stocking!! I'm making it for my nephew.


I'm a slow knitter, and i'm only about 20 rows away from it hitting the fan! This will be my first "sock" ever!


Currently, I am reading Popped by Carol Higgins Clark. It is the next book in a series that i've been reading for awhile now. It's just a light, easy read... perfect for the summer!


What are you working on this week? You can always link up with me!!
I am linking up with Tami's WIP, Ambassador Crochet, Yarn Along, Hooking on Hump Day and SusanD's.

Now it's your turn to link up with me!


Tuesday, July 24, 2012

Year Of Scraps!


Back in the end of May I decided to start collecting all of my yarn scraps, so see what a years worth of yarn would look like.

2 full months later, and 1 oz of yarn. This is my current jar!


2 months!!! This jar is never going to make it a whole year.

And thanks to pinterest, I know exactly what i'm going to do with the yarn come the spring! Which, I'll probably restart this before the end of May due to this reason.


This is such a great idea, and i'll probably have enough yarn to fill 2 or 3 of these to place at my house, my brothers and my parents house.


Saturday, July 21, 2012

Poinsettia Christmas Ball


I'm still working on getting a good stock of Christmas gifts. So I started working on a new Christmas Ball Cover.


These Christmas balls look so pretty on a tree! And I always purchase a whole bunch right after the season for cheap!


Poinsettia Christmas Ball

You'll need a steel hook size 5 and size 10 cotton yarn, like Aunt Lydia's.

To Start: Ch 8, join with sl st to form a ring.
Row 1: Ch 1, 16 sc in ring, join with first sc.
Row 2: Ch 1, sc in same sc and in each remaining sc ending with sc; join to first sc.
Row 3: Ch 3, *sc in next sc, ch 3, repeat from * around ending with ch 3; join with first sc.
Row 4: Sl st in next ch of next ch 3 sp and in same sp, ch 8 *dc in next ch 3 sp, ch 5, repeat from * around ending with ch 5; join with sl st in 3rd ch of beginning ch 8.
Row 5: Sl st in next 2 chs of next ch 5 sp, ch 1, * in next ch 5 sp work 5 dc, ch 3, 5dc; sc in next ch 5 sp; repeat from * around ending with dc; join with sl st in first sc.
Row 6: Sl st to 1st ch 3 sp, ch 10, *sc in middle next ch 3 sp, ch 10, repeat from * around ending with sc; ch 6, tc in base of 1st ch 10 to form last ch 10.
Row 7 & 8: Ch 10 * sc in middle of next ch 10, ch 10; repeat from * around ending with sc; ch 6, tc in first ch of first ch 10 to form last ch 10.
Row 9: Ch 10 * sc in middle of next ch 10, ch 10; repeat from * around, join with sl st in beginning sc.
Row 10: 10 sc in each ch 10 space around; join with sl st in beginning sc.
Row 11: Sl st in next 5 sts, {{{At this point and time slip on a ball, you'll be crocheting around the ball.}}} *Ch 10, sk next ch 10 sp, sc in 5th st in the following ch 10 sp, repeat from * around for a total of 4 ch 10 sps; sl st in beginning ch and bind off.

The crocheting should be tight enough around the ball that you do not need to leave a long tail to gather the loops to pull them around the neck of the ornament.


Thursday, July 19, 2012

Basketweave Coffee Cozy


I took a big step in my knitting today! I knit in a round with 4 double pointed needles!!! I know for some, it doesn't seem like a lot, but for me, it's a really big step to take. It really wasn't that bad either.

So what did I make? A little coffee cozy! I set off to try to make this coffee cozy. But as you can see, it's totally different.


I was going by memory, and thought it was K4, P4, K4 on each needle... and then the basketweave part of it was a total accident! I don't even know what I did to be honest, because I stayed on the K4, P4, K4 pattern.


So even though it didn't come out the way I had initially thought... it still looks pretty awesome! And not bad for the first time working in a round and with 4 needles.


Covered Cozy Untangled Earphones pt. 2

I showed you before how I made Covered Untangled Cozy Earbuds with worsted weight yarn. I love my new earbuds! I never have to worry about them being untangled, even when I just throw them in my purse. It's lovely.

My husband wanted me to make him a pair, but he didn't want it as bulky as mine. So I decided to try a fingering sock yarn. Truthfully, after I made his, I wasn't happy with it. I made another one for my nephew, and again, I didn't like it.

So I played around with a new fingering sock yarn, and played around with needle size as well as number of stitches on the needle. And, I finally came up with this one, which I absolutely love!


With the worsted weight yarn, I casted on 3 and worked the i-cord up. When I hit the "V", I increased to 6 and worked 3 stitches up both sides. {I explained it better in my post. At least I think I explained it better.}


For the fingering weight / sock yarn, I casted on 5, and worked the i-cord up. At the "V" I only increased once. Each ear going up I only worked 3 stitches, instead of the 5. I probably would have been fine increasing 3, and working 4 stitches up each ear wire.

If you read my other post, you'll probably get a better idea on how this works. You can also youtube iPhone i-cord and there's a ton of videos!!


Check out the difference between the fingering yarn and the worsted weight.


HUGE difference!!! Although I do love them both, I guess it just depends on which one I grab for the day.

I love my covered cozy untangled earphones!!


Wednesday, July 18, 2012

WIPW: Work-In-Progress Wednesday


This weekend I spent some fun in the sun! So I haven't been working on much, but I did go to "stitch-n-bitch" last night where I started this mesh market bag.

I'm not too sure what I think of it yet. For some reason I think it's a lot wider than it needs to be. I guess we'll see when it's finished!


I'm also working on another Covered Untangled Cozy Earbuds, this time with a sock/fingering yarn, size 3 knitting needles and casting on 5 for the icord.

I am liking this one a whole lot better than the first one I made!!


I am not listening to any books right now, but I am reading Exiled by J.R. Wagner. It's actually a free book available on goodreads, I tried to download it for my nook, and it was $5 from Barnes and Nobel! But I was able to download it straight from the goodreads site for free. I'm all about the free!! Which is why I get half of my ebooks from the public library.


What have you worked on this week? You can always link up with me!
I am linking this bad boy up over at Tami's WIP, Ambassador Crochet, Yarn Along, Hooking on Hump Day and SusanD's.


Wednesday, July 11, 2012

WIPW: Work-In-Progress Wednesday


Well, no little projects this week. I did finish my untangled earbud cozy, and then finished two more as well! But for right now, the only thing i'm really working on is my angel baby blanket. I'm hoping to finish it up in the next few days! I'm also hoping I have enough yarn. It'll be close. :)


Since I finished my Covered Untangled Cozy Earbuds, I finished the book I was listening to last week, and started The Peach Keeper by Sarah Addison Allen . I am still reading The Descendants by Kaui Hart Hemmings.


What have you worked on this week? You can always link up with me!
I am linking this bad boy up over at Tami's WIP, Ambassador Crochet, Yarn Along, Hooking on Hump Day and SusanD's.


Editing to add: I finished this evening!! It looks so good!

Tuesday, July 10, 2012

License Plate Game


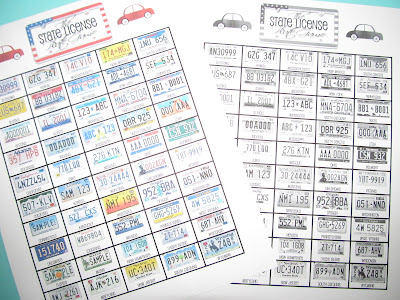
Growing up we played The License Plate Game whenever we traveled! We had a cute little mat with stickers of license plates, and whenever we found one, we'd stick the plate on the respective state. It was such a fun goal to reach all 50! I do not remember how long it took us to reach all 50 states, but we did it. And although we wanted to start over again, we could never find the same mat and stickers, or anything close to it.


Fast forward to the age of Pinterest!!
I came across The "Road Trip" Date, and her lovely template of license plates! She just crossed out the plates when she found them.... but where's the fun in that?

So, after thinking for a little while, I made a version of my own!

What you need is:
  • Card Stock
  • 8.5" x 11" shipping labels
  • Printer, where you can print b&w and color copies
  • Craft Knife
  • Pocket Folder


I actually did not have a craft knife. Well, I do... but I kind of lost it at the moment. So in my anticipation to make this game, I used a Creative Memories Custom Cutting Blades to do the cutting I needed to make. It worked just as nicely!


The very first thing you do is print the pattern from The Dating Diva's, you can find it here.


I printed a black and white copy on to the card stock, and a color copy onto the shipping label.

You then have to take the color copy, the one on the shipping label, and cut around each plate with the craft knife.


You do not need to be perfect. I cut straight lines on the top and bottom, and then on each side. If you really wanted to take your time, you can round the corners with your craft knife.... but for me, the easier the better!

You do not want to cut to where each piece falls away and you have to store them in a ziplock bag. You're cutting just so it cuts the label part, and not the part you peel away.

Cutting around all 50 license plates can be a little tedious, but it's totally worth it for all of the fun you're going to have when you travel!


Last, but not least. Place the pages in the pocket folder and store in your car! Whenever you see a license plate, have a passenger peel it off the sticker sheet and onto the card stock side! See how long it takes you to get all 50 States!!


These make a very easy gift as well! Especially since you have to buy packs of the card stock and shipping labels. Pick up the pocket folders when they go on sale for Back-To-School to make it cheaper on yourself as well.

Sunday, July 8, 2012

Yarn Bowl

I've been wanting a yarn bowl for awhile now, but never found one that I liked. Or I always thought they were TOO expensive.

However, today at a craft fair, I found one that I love!! I love dragonflies, and was so happy when I found this I may or may not have screamed out loud.

Friday, July 6, 2012

Quilted Crochet Afghan {unfinished}

About a month ago I posted about starting a new afghan using a 10" Square. But I only showed you the one square.

Well, here's the rest of the afghan so far!


I am very pleased with the progress this afghan is making. The only real issue I have, is I do not sew well. Not at all! But, I did whip out these 5 pieces and will make more at some point.

This afghan is a practice afghan, because I want to take clothes that we bought for my daughter and make them into a Crochet Quilt. I wanted to see how well I could sew the squares as well as how well I could crochet around them. Well, I am pleased!! Even though i'd much rather go to the dentist than sew squares. ;)


So right now i'm at a stand still. I do have more fabric to make more squares, but I just don't feel like sewing right now. However, I do want to finish this afghan before I start the one using my daughters clothes! I do know someone who can quilt, and will take her clothes and make them into squares for me..... but I really want to be the one to do it myself.


Anyways, this is how I made the fabric squares!

I started with a Fat Quarter that I found at the craft store for $1! I was able to make the 5 squares out of this. I'm sure a more experienced quilter could do better.


I cut the fabric into 5" squares, and put a piece of batting between two of the pieces. Then after pinning it together, I sewed away!


See how there is fabric on both sides? This way the fabric is a little stronger for the yarn as well as there is no solid front or back to this afghan. It can be placed either way and look beautiful!!


Using the same method I had used in my Crochet Towel Toppers, I hole punched around the square using my 1/16" hole puncher and started crocheting into the holes with a size F hook. After the first initial single crochet, I did a second single crochet using an H hook.


From this point on, I followed this pattern to complete my square!

Round 1: Sl st in next dc and into ch 2 sp, ch 1, (sc, ch 2, sc) in same sp, *(sc in back loop only of each dc across, {sc, ch 2, sc} in next ch 2 sp)*twice, sc in back loop only of each dc across, join with sl st in beginning sc.

Round 2: Sl st into corner ch 2 sp, ch 1, (sc, ch 2, sc) in same sp, *(ch 3, sk 2 sc, sc in next sc)8 times across, ch 3, sk 2 sc, (sc, ch 2, sc) in corner ch 2 sp)*twice, (ch 3, sk 2 sc, sc in next sc)8 times across, ch 3, sk 2 sc, join with sl st in 3rd ch of beginning sc.

Round 3: Sl st into corner ch 2 sp, ch 3, (dc, ch 2, 2 dc) in same sp, *(3 dc in each of next 9 ch 3 sps, {2dc, ch 2, 2 dc} in corner ch 2 sp)*twice, 3 dc in each of the next 9 ch 3 sps, join with sl st in 3rd ch of beginning ch 3.

Round 4: Sl st in next dc and into corner ch 2 sp, ch 3, (dc, ch 2, 2 dc) in sampe corner sp, *({ch 1, sk next dc, dc in next dc}15 times, ch 1, sk next dc, {2 dc, ch 2, 2dc} in cornerch 2 sp)*twice, {ch 1, sk next dc, dc in next dc}15 times, ch 1, sk next dc, join with sl st in 3rd ch of beginning ch 3.

Round 5: Sc in each st and each ch 1 sp around, with 3 sc in each corner ch 2 sp, finish off.


To assemble the afghan, I just took the 10" squares and the quilted squares and sewed them together with a tapestry needle.


I really love the way this afghan is turning out!! It will take me awhile to finish it, but I know when it is finished, it'll be beautiful!!! I think right now i'd like to finish this by Christmas so I can give it away as a gift. That's my goal.
Related Posts Plugin for WordPress, Blogger...