Showing posts with label apparel. Show all posts

Sunday, December 23, 2012

Moss Stitch Knit Mittens


When my sister-in-law asked if I could make her a pair of mittens, I told her how I never made mittens before, but it wasn't going to stop me!

Knit and Crochet. They are two completely different types of yarn work, and I am so glad that I know how to do both. They both have their positives and negatives. Crochet does happen to be a lot faster, and as for knit, I believe there are certain items that look better knit. Mittens, happen to be one of them.

So yes, when my sister-in-law asked if I would make her a pair of mittens, I could have crocheted them. I also could have chosen a simpler pattern. But, I did not. I choose a moss stitch pattern, that the pattern writer called "Mittens To Match Hermione's Deathly Hallows Graveyard Beret". I would have tried the hat as well, but ran out of yarn. I could not find any yarn that would match the dye lot... plus I wasn't sure if my sister-in-law wanted a hat as well.


I'm going to copy the pattern here as well. I really liked these mittens, and I would hate to want to make them again, and have the pattern not be there anymore. I'm saving paper too! The one thing I am doing, is switching the pattern for the RIGHT HAND and LEFT HAND. I found that the pattern for the LEFT HAND really fit my right hand better. Strange.

You will need worsted weight yarn, Size 5 DP needles, and 2 stitch markers.
Cuff:
Cast on 44 stitches. Distribute them over DP needles, making sure each needle has an even number of stitches
Join in the round, making sure not to twist the work.
K1 P1, repeat to the end of row
Continue this pattern for 3 inches


Right Hand:
Row 1: Knit around
Row 2 & 3: K2, P2, repeat to end of row
Row 4 & 5: P2, K2, repeat to end or row
Row 6: *K2, P2* repeat 3 more times, place stitch marker, M1, K2, M1, place stitch marker, P2, *K2, P2* repeat 5 more times
Row 7: *K2, P2* repeat 3 more times, stitch marker, P1, K2, P1, stitch marker, P2, *K2, P2* repeat 5 more times
Row 8: *P2, K2* repeat 3 more times, stitch marker, K1, P2, K1, stitch marker, K2, *P2, K2* repeat 5 more times
Row 9: *P2, K2* repeat 3 more times, stitch marker, M1, K1, P2, K1, M1, stitch marker, K2, *P2, K2* repeat 5 more times
Row 10 & 11: *K2, P2* repeat 3 more times, stitch marker, P2, K2, P2, stitch marker, P2, *K2, P2* repeat 5 more times
Row 12: *P2, K2* repeat 3 more times, stitch marker, M1, K2, P2, K2, M1, stitch marker, K2, *P2, K2* repeat 5 more times
Row 13: *P2, K2* repeat 3 more times, stitch marker, P1, K2, P2, K2, P1, stitch marker, K2, *P2, K2* repeat 5 more times
Row 14: *K2, P2* repeat 3 more times, stitch marker, K1, P2, K2, P2, K1, stitch marker, P2, *K2, P2* repeat 5 more times
Row 15: *K2, P2* repeat 3 more times, stitch marker, M1, K1, P2, K2, P2, K1, M1, stitch marker, P2, *K2, P2* repeat 5 more times
Row 16 & 17: *P2, K2* repeat 3 more times, stitch marker, P2, K2, P2, K2, P2, stitch marker, K2, *P2, K2* repeat 5 more times
Row 18: *K2, P2* repeat 3 more times, stitch marker, M1, K2, P2, K2, P2, K2, M1, stitch marker, P2, *K2, P2* repeat 5 more times
Row 19: *K2, P2* repeat 3 more times, stitch marker, P1, K2, P2, K2, P2, K2, P1, stitch marker, P2, *K2, P2* repeat 5 more times
Row 20: *P2, K2* repeat 3 more times, stitch marker, K1, P2, K2, P2, K2, P2, K1, stitch marker, K2, *P2, K2* repeat 5 more times
Row 21: *P2, K2* repeat 3 more times, stitch marker, M1, K1, P2, K2, P2, K2, P2, K1, M1, stitch marker, K2, *P2, K2* repeat 5 more times
Row 22 & 23: *K2, P2* repeat 3 more times, stitch marker, P2, K2, P2, K2, P2, K2, P2, stitch marker, P2, *K2, P2* repeat 5 more times
Row 24: *P2, K2* repeat 3 more times, stitch marker, M1, K2, P2, K2, P2, K2, P2, K2, M1, stitch marker, K2, *P2, K2* repeat 5 more times
Row 25: *P2, K2* repeat 3 more times, stitch marker, P1, K2, P2, K2, P2, K2, P2, K2, P1, stitch marker, K2, *P2, K2* repeat 5 more times
Row 26: *K2, P2* repeat 3 more times, stitch marker, K1, P2, K2, P2, K2, P2, K2, P2, K1, stitch marker, P2, *K2, P2* repeat 5 more times
Row 27: *K2, P2* repeat 3 more times, remove first stitch marker. Using a yarn needle pull a piece of holding
yarn through the stitches between the markers, you will come back to these stitches later. Remove second stitch marker. Cast on 2 stitches onto the needle with your first 16 stitches. These stitches replace the original two that are now part of the thumb gusset. Continue working with the stitches beyond the second stitch marker P2, *K2, P2* repeat 5 more times. You should now have recreated a circle of 44 stitches for the hand portion.
Row 28: P2, K2, repeat to end or row
Row 29: P2, K2, repeat to end or row
Row 30: K2, P2, repeat to end of row
Row 31: K2, P2, repeat to end of row
Continue knitting in pattern until the mitten is long enough to hide your pinky finger (stretched is fine), making sure the last 2 rows are repeats of P2, K2.
Begin following instructions for Hand decrease.


Left Hand:
Row1: Knit around
Row 2 & 3: K2, P2, repeat to end of row
Row 4 & 5: P2, K2, repeat to end or row
Row 6: K2, P2, place stitch marker, M1, K2, M1, place stitch marker, P2, *K2, P2* repeat 8 more times
Row 7: K2, P2, stitch marker, P1, K2, P1, stitch marker, P2, *K2, P2* repeat 8 more times
Row 8: P2, K2, stitch marker, K1, P2, K1, stitch marker, K2, *P2, K2* repeat 8 more times
Row 9: P2, K2, stitch marker, M1, K1, P2, K1, M1, stitch marker, K2, *P2, K2* repeat 8 more times
Row 10 & 11: K2, P2, stitch marker, P2, K2, P2, stitch marker, P2, *K2, P2* repeat 8 more times
Row 12: P2, K2, stitch marker, M1, K2, P2, K2, M1, stitch marker, K2, *P2, K2* repeat 8 more times
Row 13: P2, K2, stitch marker, P1, K2, P2, K2, P1, stitch marker, K2, *P2, K2* repeat 8 more times
Row 14: K2, P2, stitch marker, K1, P2, K2, P2, K1, stitch marker, P2, *K2, P2* repeat 8 more times
Row 15: K2, P2, stitch marker, M1, K1, P2, K2, P2, K1, M1, stitch marker, P2, *K2, P2* repeat 8 more times
Row 16 & 17: P2, K2, stitch marker, P2, K2, P2, K2, P2, stitch marker, K2, *P2, K2* repeat 8 more times
Row 18: K2, P2, stitch marker, M1, K2, P2, K2, P2, K2, M1, stitch marker, P2, *K2, P2* repeat 8 more times
Row 19: K2, P2, stitch marker, P1, K2, P2, K2, P2, K2, P1, stitch marker, P2, *K2, P2* repeat 8 more times
Row 20: P2, K2, stitch marker, K1, P2, K2, P2, K2, P2, K1, stitch marker, K2, *P2, K2* repeat 8 more times
Row 21: P2, K2, stitch marker, M1, K1, P2, K2, P2, K2, P2, K1, M1, stitch marker, K2, *P2, K2* repeat 8 more times
Row 22 & 23: K2, P2, stitch marker, P2, K2, P2, K2, P2, K2, P2, stitch marker, P2, *K2, P2* repeat 8 more times
Row 24: P2, K2, stitch marker, M1, K2, P2, K2, P2, K2, P2, K2, M1, stitch marker, K2, *P2, K2* repeat 8 more times
Row 25: P2, K2, stitch marker, P1, K2, P2, K2, P2, K2, P2, K2, P1, stitch marker, K2, *P2, K2* repeat 8 more times
Row 26: K2, P2, stitch marker, K1, P2, K2, P2, K2, P2, K2, P2, K1, stitch marker, P2, *K2, P2* repeat 8 more times
Row 27: K2, P2, remove first stitch marker. Using a yarn needle pull a piece of holding yarn through the stitches between the markers, you will come back to these stitches later. Remove second stitch marker. Cast on 2
stitches onto the needle with your first 4 stitches. These stitches replace the original two that are now part of the thumb gusset. Continue working with the stitches beyond the second stitch marker P2, *K2, P2* repeat 8 more times. You should now have recreated a circle of 44 stitches for the hand portion.
Row 28: P2, K2, repeat to end or row
Row 29: P2, K2, repeat to end or row
Row 30: K2, P2, repeat to end of row
Row 31: K2, P2, repeat to end of row
Continue knitting in pattern until the mitten is long enough to hide your pinky finger making sure the last 2 rows are repeats of P2, K2.
Begin following instructions for Hand decrease.

Note: When creating the thumb gusset for the left hand - there will be 16 stitches, then a place marker, a variable number of stitches, then another place marker, followed by a 26 stitches. When creating the thumb gusset for the right hand - there will be 4 stitches, then a place marker, a variable number of stitches, then another place marker, followed by a 38 stitches.


Hand Decrease:
The previous 2 rows knit should have been repeats of P2, K2. The number in parentheses is the number of stitches you should have after completing the row.
Row 1: S1, P2tog, psso, P1, K2, *P2, K2* repeat 3 more times, S1, K2tog, psso, K1, P2, *K2, P2* repeat 3 more times (40)
Row 2: *P2, K2* repeat 4 more times, *K2, P2* repeat 4 more times (40)
Row 3: S1, P2tog, psso, P1, K2, *P2, K2* repeat 2 more times, P2, S1, K2tog, psso, K1, P2, *K2, P2* repeat 2 more times, K2 (36)
Row 4: *P2, K2* repeat 8 more times (36)
Row 5: S1, P2tog, psso, P1, K2, *P2, K2* repeat 2 more times, S1, K2tog, psso, K1, P2, *K2, P2* repeat 2 more times (32)
Row 6: *P2, K2* repeat 3 more times, *K2, P2* repeat 3 more times (32)
Row 7: S1, P2tog, psso, P1, K2, *P2, K2* repeat 1 more time, P2, S1, K2tog, psso, K1, P2, *K2, P2* repeat 1 more time, K2 (28)
Row 8: *P2, K2* repeat 6 more times (28)
Row 9: S1, P2tog, psso, P1, K2, *P2, K2* repeat 1 more time, S1, K2tog, psso, K1, P2, *K2, P2* repeat 1 more time (24)
Row 10: *P2, K2* repeat 2 more times, *K2, P2* repeat 2 more times (24)
Bind off using Kitchener closure.


Thumb:
You should have a hole with 16 stitches on your holding yarn and an edge from the hand part of the glove. Pick up 4 stitches from the hand portion. Slip the stitches from the holding yarn as well as the picked up stitches onto DP needles. Distribute 3 of the picked up stitches on the needle from which you will begin knitting, these will be the first 3 stitches of your row. Place the last picked up stitch on the last knitting needle. This will be the last stitch of your row. Recall that when you moved the stitches to the holding yarn you had just done this with them (K1, P2, K2, P2, K2, P2, K2, P2, K1). Now you have 3+16+1. Therefore you should begin with this sequence so you continue correctly within the pattern:
Row 1: *P2, K2* repeat 4 times (20)
Row 2 & 3: *K2, P2* repeat 4 times (20)
Row 4 & 5: *P2, K2* repeat 4 times (20)
Row 6-9: Continue to knit in the round and follow the moss stitch pattern, repeating rows 2-5 (20)
Row 10-13: Continue to knit in the round and follow the moss stitch pattern, repeating rows 2-5 (20)
Row 14: S1, P2tog, psso, P1, K2, P2, K2, S1, K2tog, psso, K1, P2, K2, P2 (16)
Row 15: P2, K2, P2, K4, P2, K2, P2 (16)
Row 16: K2, P2, K2, P4, K2, P2, K2 (16)
Row 17: S1, P2tog, psso, P1, K2, P2, S1, K2tog, psso, K1, P2, K2 (12)
Row 18 & 19: K2, P2, K2, P2, K2, P2 (12)
Row 20: S1, K2tog, psso, K1, P2, S1, K2tog, psso, K1, P2 (8)
Bind off using Kitchener closure.

Saturday, December 8, 2012

Bearded Viking Hat

About a month ago my brother told me exactly what he wanted for Christmas.... a bearded viking hat. Cue me thinking "oh goodness". I debated for the longest time on if I would attempt to make one or buy one.

Seeing that the cheapest one I found was $45... and how that exceeds our spending limit. I decided to finally attempt to make it.

I spent all day today on the beard. Yes. All day! It took a skein and a quarter to make the beard. You can find the link to the pattern on Ravelry by clicking here.


Tomorrow I'll tackle the viking hat. And on Christmas i'll be sure to snap a picture of what it looks like on my brother! I hope he loves it.

Tuesday, February 21, 2012

Despicable Me Minion Crochet Hat

My cousin had professional photos done of her son in the Despicable Me Minion Crochet Hat I crocheted for him! He looks so stinking cute!!


Seeing it on his head nicely here, it looks like I could have added an extra row or two, so i'll edit my original post about it. But how cute is he??

Saturday, January 28, 2012

Bearded Beanie Hat Pattern

The original post for this Bearded Beanie Hat is located here.

The birthday party for the sweet little 1 year old was today. He got the hats I made him and it was too cute! However, when we tried to get him to wear the bearded hat, it didn't go so well.


Look how cute!! He just wasn't having it, which is a good thing I made the beard removable. I do hope that the beard is something that he could get used to after a little while though. Maybe when it's a little quieter and less people around? As the mom was putting the hat on though, the beard did look a little big.

Which I found very funny! After I made the original pattern, I thought to myself that the beard was way too small. So I made it a little bit longer. However, now, it looks like it would have been perfect the first time around.

There was an 18-month old at the party as well. Just so I could get an idea... we had him try it on. Again, he didn't like the beard. But he was able to wear it for a quick minute so I could snap a picture and get an idea.


Yup. The beard is too big. I think with just the extra length I added onto the side taken off, it should be fine!

I am going to post the pattern for the beard, even though it may not be 100% perfect. If you have a little one in front of you, you could always do a little trial and error. If you attempt this pattern, please let me know! I'd love to hear how it came out and if you changed anything!!


To make the beard:
To start, chain 31.
Row 1 - sc in second ch from hook and in each st across. {30}
Row 2 - ch 1, turn, sc across. {30}
Row 3 - ch 1, turn, sc2tog, sc to last 2 sts, sc2tog {28}
Row 4 - ch 1, turn, sc in next 7 sts, hdc in next 2 sts, dc in next 10 sts, hdc in next 2 sts, sc in last 7 sts {28}
Row 5 - ch 1, turn, sc2tog, sc in next 9 sts, sc2tog, dc in next 2 sts, sc2tog, sc in next 9 sts. {24}
Row 6 - ch 1, turn, sc2tog, sc in next 9 sts, sc2tog, dc in next 2 sts, sc2tog, sc in next 9 sts. {22}
Row 7 - ch 1, turn, sc in next 5 sts, hdc in next st, ch 10, skip 10 sts, hdc in next st, sc in next 5 sts {22}
Row 8 - ch 1, turn, sc in next 4 sts, 3 dc in next st, dc 10 times in ch sp, 3 dc in next st, sc in next 4 sts.
Row 9 - With wrong side facing you, ch 1, sc 6 times on the edge of the beard.
Row 10 - Repeat row 9.
Row 11 - ch 1, turn, sc in next 2 sts, ch 3, skip 2 sts, sc in remaning sts. {This makes the button loop for the removable part of the beard. If you are sewing your beard into the hat, just repeat row 9.} Fasten off.

On the opposite side of the beard, complete row 9-11. Fasten off.


On my original beard, I repeated Row 9 - 3 times instead of just the once. I think that little tiny added length taken off it'll help a lot!

Pin It

Friday, January 27, 2012

Despicable Me Minions Crochet Hat


Look!!! It's a Despicable Me Minion!! I know, I know... how freaking adorable, right???

I once again set out to make this without a real pattern to go by, and I think it turned out awesome! This hat is for a 1 year old, so I used a hat size that'll fit 12-24 month olds.

Hat:
Start off with an adjustable ring, and 13 dc in ring.
Round 1: ch 3 (counts as first dc), dc in same st as ch 3, dc twice in each dc around, sl st in third ch. {26}
Round 2: ch 3 (counts as first dc), dc twice in next dc, (dc in next, 2 dc in next) around, sl st in third ch. {39}
Round 3: ch 3 (counts as first dc), (dc twice in next dc, dc in next 2 st) around, sl st in third ch. {52}
Round 4 - 8: ch 3 (counts as first dc), dc in each st around, sl st in third ch. {52}
Round 9: Change color, ch 3 (counts as first dc), dc in each st around, sl st in third ch. {52}
Round 10 - 11: Change color, ch 3 (counts as first dc), dc in each st around, sl st in third ch. {52}
Round 12: Turn hat so that the right side is facing out. ch 1, sc in each st around, sl st, and finish. {52}

Eye:
{White Part} - In an adjustable ring, make 17 tr, sl st into beginning ch and fasten off.
{Black Part} - In an adjustable ring, make 9 sc, sl st into beginning ch and fasten off.
{Grey Part} - Round 1: In an adjustable ring, make 17 tr, sl st into beginning ch,
Round 2: ch 1, sc around in each st, sl st.
Round 3: ch 1, sc around in each st in FRONT LOOP ONLY, sl st and fasten off.

Sew all of the pieces together, and onto the hat.

To make the hair pieces, I pulled up a strand of black yarn around one of the dc and tied it in a knot. Then cut to an appropriate length. You can do this as little or as many times as you'd like.


And that's it!! So very simple!!


As you can see, he loved the hat!! He didn't wear it long, so she didn't really fool around with it to make it fit perfectly. However, it looks as though I could have gotten away with making it a row or two longer. That might be something you want to keep in mind as you make one using the pattern above.


Pin It

Wednesday, January 25, 2012

Bearded Beanie Hat

I've been wanting to make one of these for a long time. I saw a random picture of someones child with this type of crocheted hat on. Since then I was looking for a pattern for a child's hat, and never found one. So.... here comes in my playing around with some yarn and a hook. This is what I got!


I made this for my cousins little boy. His first birthday party is on Saturday. The best part about this bearded beanie hat is that the beard comes off!!


The beard has button holes and I sewed some buttons into the hat itself. I know how little kids sometimes do not like things on their face, this way, if he doesn't like it, he can still wear the hat.

I did make a pattern for this. However, it has not been tested out on the little boy yet. I have no idea if it'll really work or not the way I made it. So I will not be posting the pattern for a few more days. This is just a little spoiler!


ETA: You can now view the pattern for the beard HERE.


Pin It

Sunday, January 1, 2012

Angry Birds!!

Once I found the awesomeness which is Pinterest, I found the wonderful idea for Angry Bird Hats! After lots of searching, I found very minimal free patterns. I refuse to pay for a pattern! Unless they're in books at a garage sale for a quarter. He he.

I took a little bit of knowledge and a whole lot of "let's see if this works" and made these!


These however were not the first ones that I've made. The first couple that I made were not as good as I feel the red and black ones are above. Here was it was they looked like at first.


I have learned from my mistakes with these hats. Since playing around with a few different ways, and styles of putting these together, I think it's much better now! I came up with a tutorial for you. I do not have a pattern for this... just the tutorial.


I first started out with just a normal hat pattern. I make an adjustable ring, or you can ch 3 and join with a slst into the first ch to make a loop. I then make 10 dc in the ring to start. Row 2 I dc twice in each dc around, Row 3 I (dc, 2dc) around, Row 4 (dc twice in next dc, dc in next 2 dc) around.... so on and so forth like I had done in the previous hats I had made. Each row will have stitches in multiples of 10.

For my younger nephew, I worked till I had 60 stitches around. For my older nephew, I worked till I had 70 stitches around. I then worked about 5 more rows at same amount of stitches around in the same color. After that I switched to the white yarn, and worked one row with that color.

Now I had to crochet all of the goodies. To make the eye I started again with an adjustable ring and made about 7 or 8 sc in the ring. Then, working the same way you did the hat, row 2 had 2 sc in each st, and row 3 had (2 sc, sc in next) around. Then I finished it off.

For the black part, I started with an adjustable ring and worked about 7 sc in the ring. Then I finished it off. I sewed together these two pieces before attaching them to the hat.

The eyebrows I always seem to do differently for each hat. They do have the same basics. I ch about 13, then in the 9th ch, I do a triple/treble crochet. Sometimes I do another triple/treble and sometimes I skip right down to the double. I do a couple double, a couple half double and a couple single. As long as it gets from triple/treble to single... it really doesn't 100% matter how many you make. You may have to play around and see what looks good.

The only thing is, what you do for one eyebrow, make sure you do the exact same to the other!

The beak is something you should play around with also. I ch 5 or 6 and work with dcs. The next row be sure to dc2tog. Sometimes I do this at both ends, sometimes I do it just in the middle. Work your way down to a point. Depending on the hat size, but I try to do no more than 3 or 4 rows.

For the black bird, I thought this would be very difficult to make. This was my first attempt and it came out just the way I imagined!
Starting with the orange, I made an adjustable ring and made 8 dc in the ring. For row 2, I held the right side {the good looking side} away from me. I then dc once in each st around... however, you have to dc in the front loop only! That is what makes the turn. For the last two rows, I switched to the black yarn and dc in each loop, you can go back to going through both loops.

After you join the last round, make sure your tail is long enough to sew into the hat. I used a crochet needle and sewed each stitch through the hat.

For the red hat, and I would probably do the same for the other colors as well, I ch 15 or so, then made 2 or 3 rows of sc. They will curl up and this is what you are looking for! I made two of them for the red hat shown above, at two different lengths.

If you do not want to venture out to make those, you can always make a puff ball like in the first couple of hats I made. Whatever you choose, it's still cute!

The first couple hats I made, I did not do this step. Which is why some of the eyebrows aren't "angry" enough for my liking! But I took out my pins and pinned each of the pieces onto my hat until they were perfect! Then I sewed them on.


Ta da!! All sewed and looking pretty good! The sewing part takes forever for me, it's the part I hate the most.... but it's totally worth it in the end.


I also didn't do this step for the first few I made, which is why some of the angry bird faces are off when they get on the head of the child I made them for. But now I fold the bird in half after I'm done sewing. I count the stitches and determine how long I want the ear flaps. I place the ear flap directly in the middle. I ch between 10-15 dc for the ear flap. Row 2, I ch 3, then dc2tog, ch until there are 3 st left, dc2tog and then dc to finish the row. I continue that pattern until you only one two left.

Be sure to line up the 2nd ear flap with the first. Do that one the exact same way. If you like looking at patterns better, I do have a pattern for ear flaps for this baby hat. You of course want to make it bigger for bigger hats.

After you are done with the 2nd ear flap, join in a st on the back of the hat, and sc a border around the hat and ear flaps in white.

I then join braided tassels, and it's done!


My nephew also wanted the white dot that is in the middle of the black birds forehead. I made the dot the same way I made the black part of the eye. Just 8 or 9 sc in an adjustable ring.


I hope this tutorial is easy to follow. I'll be honest, they are not the prettiest crocheted angry bird hats out there, but they work! My nephews love them and I have already gotten a lot of compliments on them. My brother has told me that a few people are wondering if I sell them. I think i'll be making more in the future!

Wednesday, December 28, 2011

Baby Hat with Ear Flaps

There are lots of new babies all around me. So for Christmas I made my cousins son this very cute hat! I got the pattern from Neanners Shop.

I used Bernat Baby yarn because I love love love their yarn! I love how soft it is. Other baby yarns softness doesn't come close!

This hat is not just as baby hat, you can adjust it to any size you may need! However, this is the pattern for 3-6 Months.

Download the Printable Pattern


Baby Hat with Ear Flaps
Ch 3, sl st in first ch to form ring.
Row 1: Ch 3, dc 11 in ring, sl st in third ch.
Row 2: Ch 3, dc in same st, dc twice in each dc around, join. {24}
Row 3: Ch 3, dc twice in next dc. (dc, 2dc) around, dc in last dc, join. {36}
Row 4: Ch 3, (dc twice in next dc, dc in next 2 dc) around, join. {48}
Row 5: Ch 3, dc in each dc around, join.
Row 6-8: Change color to make stripe. You can make one solid stripe or change colors like in picture. Ch 3, dc in each dc around, join.
Row 9: Change color back to main. Ch 3, dc in each dc around, join.

To make ear flaps:
Sl st in next 7 st. {You may also cut your yarn and join it in any st}
Row 1: Ch 3, dc in next 9 dc, turn.
Row 2: Ch 3, dc2tog, dc next 4 dc, dc2tog, dc in last st, turn.
Row 3: Ch 3, dc2tog, dc next 2 dc, dc2tog, dc in last st, turn.
Row 4: Ch 3, dc2tog twice, dc in last st, join and fasten.

Fold hat in half and sl st in dc directly across from last dc from the other earflap. Start again with Row 1.

After the second earflap, use any color and sc around the hat to add a border.

Add braided tassels. I cut 2 pieces of yarn of each color to a desired length and pulled it through one of the st at the bottom of the ear flap. Tied it off with a knot and then braided same colored pieces together. Tied the bottom off with a knot and cut the extra length.


Isn't it super cute!!!!

Wednesday, December 21, 2011

Mary Jane Slippers


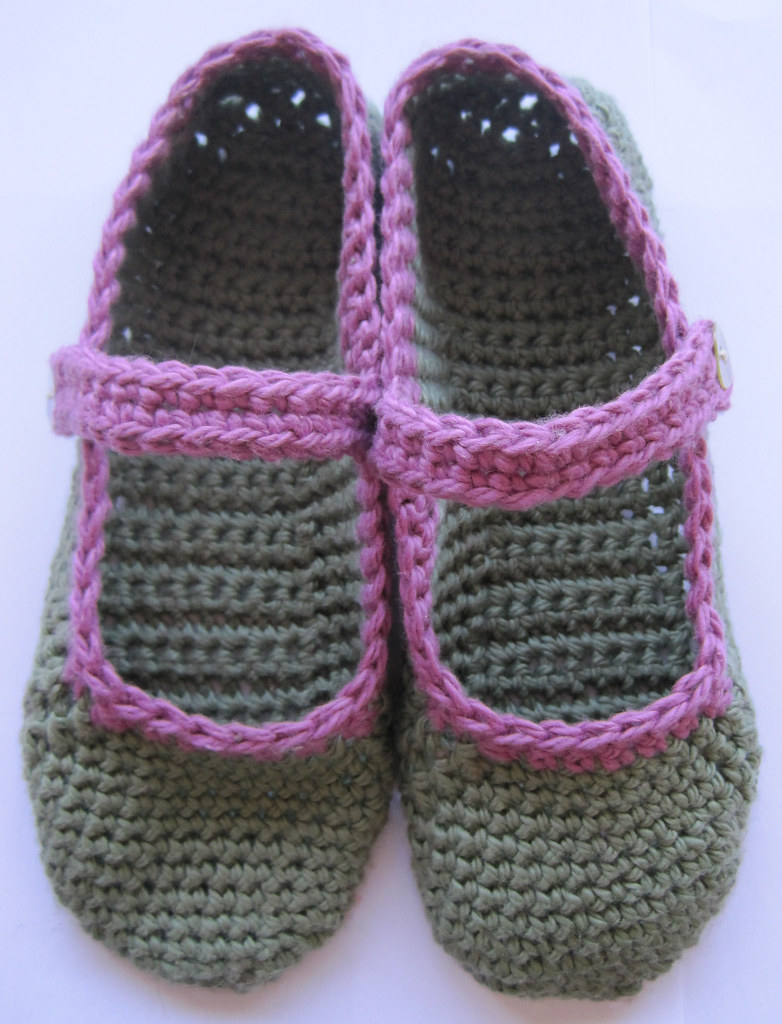
I made these super cute Mary Jane Slippers! They're very quick to make, I maybe worked 3 hours on the pair total. They're not as warm as the Slipper Socks, but they still keep my feet toasty and look fashionable at the same time! The original pattern came from Good Knits.

Download the Printable Pattern


Mary Jane Slippers
Size H Crochet Hook

Round 1: Ch 4, sl st to first chain, 8 dc into circle.
Round 2: Ch 2, 2 dc into each st, sl st into top of the first dc. {16}
Round 3: Ch 2, 1 dc into same st, 2 dc into next st, (1 dc into next st, 2 dc into next) around, sl st into first dc. {24}
Round 4: Ch2, 1 dc into same st , dc into the next, 2 dc into next st, (1 dc into next 2, 2 dc into the next) around, sl st into first dc. {32}
Round 5-6: Ch 2, 1 dc into each st.
Row 7: Ch2, 1 dc into first 23 sts. Ch 2, turn.
Row 8-19: 1 dc into each st. Ch 2, turn.
Row 20: 1 dc into first 10 stitches, dc3tog, dc to end. Fasten off, leaving long tail to seam up heel.
Fold slipper in half and seam up the back with hook & slip-stitch.
Row 21: Join yarn at center back of slipper, above the heel. Ch 1, sc into same st and then 24 sc down the side of the dcs of the slipper toward the toe, at the corner, sc3tog, 5 sc, sc3tog at the next corner, 24 sc down the side of the dcs of the slipper toward the heel, sl st into first sc.
Row 22: Ch 1, 22 sc around, sc3tog in the corner, 3 sc, sc3tog in other corner, 22 sc around, sc2tog, join and finish off.
Row 23: With an accent color, {for left foot} 31 sc or to where you want your loop closure, bring up a loop approx. 2″ long, sc as usual (just with a big loop!) then sc to the end, join and finish.
Loop: Join yarn at the loop-sc and sc all the way around it.
Sew button on opposite side.

Sunday, December 18, 2011

Baby Hat and Booties

These super cute baby hat and booties are another gift for a family member who just had a baby. The original pattern for the hat came from The Dainty Daisy.


Download the Printable Pattern for the Hat
The pattern for the flower is included. The flower pattern is for 3 rows of petals. The hat shown in yellow only has 2 rows of petals. If you choose to only add two, join and finish after the 2nd row.


Download the Printable Pattern for the Booties
I found out that baby yarn isn't the best for these. I used a regular 4 ply yarn.


Baby Hat with Flower


To Start All Sizes
Row 1:
ch 4, join to form ring
Row 2: 6 sc in ring, DO NOT JOIN
Row 3: 2 sc in each sc of previous round {12 sc}
Row 4: (2 sc in next stitch, 1 sc in next stitch) 6 times, {18 sc}
Row 5: (2 sc in next stitch, 1 sc in next 2 stitches) 6 times {24 sc}
Row 6: (2 sc in next stitch, 1 sc in next 3 stitches) 6 times {30 sc}
Row 7: (2 sc in next stitch, 1 sc in next 4 stitches) 6 tmes {36 sc}

0-3 Months
Row 8:
ch3 (this counts as first dc), dc in same stitch, ch 1, 2dc in same stitch, (skip 3 sc, (2 dc, ch 1, 2 dc) in next sc) around to beginning chain. Join.
Row 9: Slip Stich to ch 1 space, (ch 3, dc, ch 1, 2dc) in first chain 1 space, (2dc, 1 ch, 2dc) in each ch 1 space around. Join.
Row 10-14: repeat Rnd 9
Row 15: ch 1, 1 sc in same stitch and in each stitch around, join
Row 16: repeat Rnd 15
Finish Off

3-6 MONTH SIZE:
Row 8:
(2 sc in next stitch, 1 sc in next 5 stitches) 6 times {42 sc}
Row 9: ch3 (this counts as first dc), dc in same stitch, ch 1, 2dc in same stitch, (skip 3 sc, (2 dc, ch 1, 2 dc) in next sc) around to beginning chain. Slip Stitch to Join.
Row 10: Sl St to ch 1 space, (ch 3, dc, ch 1, 2dc) in first chain 1 space, (2dc, 1 ch, 2dc) in each ch 1 space around. Join.
Row 11-14: Repeat Rnd 10
Row 15: ch 1, 1 sc in same stitch and in each stitch around, join.
Row 16-19: Repeat Rnd 15
Finish.


6-12 MONTHS – 3 years:
Row 8:
(2 sc in next stitch, 1 sc in next 5 stitches) 6 times {42 sc}
Row 9: ch3 (this counts as first dc), dc in same stitch, ch 1, 2dc in same stitch, (skip 2 sc, (2 dc, ch 1, 2 dc) in next sc) around to beginning chain. Join.
Row 10: Sl St to ch 1 space, (ch 3, dc, ch 1, 2dc) in first chain 1 space, (2dc, 1 ch, 2dc) in each ch 1 space around. Join.
Row 11-15: repeat Rnd 9 Repeat Rnd 9 one more time for 12 Months – 3 Years Size
Row 16: ch 1, 1 sc in same stitch and in each stitch around, join
Row 17-18: repeat Rnd 15
Finish Off

CHILD SIZE: 3-10 Years
Row 8:
(2 sc in next stitch, 1 sc in next 5 stitches) 6 times {42 sc}
Row 9: ch3 (this counts as first dc), dc in same stitch, ch 1, 2dc in same stitch, (skip 2 sc, (2 dc, ch 1, 2 dc) in next sc) around to beginning chain. Join.
Row 10: Slip Stich to ch 1 space, (ch 3, dc, ch 1, 2dc) in first chain 1 space, (2dc, 1 ch, 2dc) in each ch 1 space around. Join.
Row 11-16: repeat Rnd 10
Row 17: ch 1, 1 sc in same stitch and in each stitch around, join
Row 18-19: repeat Rnd 17

To Start Flower: ch 7, join with sl st to form ring
Row 1: Ch 1, make 14 dc in ring, join with sl st to in first sc.
Row 2: Ch 1, sc in same sc, (ch 3, sk next sc, sc in next sc) 5 times, ch 3, sk next sc, join {7 ch-3 sp}
Row 3: Join new color with sl st in first ch-3 sp, ch 1, (sc, hdc, 3dc, hdc, sc) in same as joining, (sc, hdc, 3dc, hdc, sc) in each ch-3 sp around {7 petals}
Row 4: Ch 1, working behind petals, sc around post of first sc on round 2, ch 4, (sc around post of next sc on round 2, ch 4) around, join and fasten off. {7 ch-4 sp}
Row 5: Join new color with sl st in first ch-4 sp, ch 1 .(sc, hdc, dc, 2tr, dc, hdc, sc) in same sp as joining, (sc, hdc, dc, 2tc, dc, hdc, sc) in each ch-4 sp around {7 petals}
Row 6: Ch 1, working behind petals, sc around post of first sc on round, ch 5, (sc around post of next sc on round 4, ch 5) around, join and fasten off. {7 ch-5 sp}
Row 7: Join new color with sl st in first ch-5 sp, ch 1, (sc, hdc, 6dc, hdc, sc) in same sp as joining, (sc, hdc, 6dc, hdc, sc) in each ch-5 space around, join and fasten off. {7 petals}
Sew flower to hat.


Baby Booties

To Start:
Make 8 FHdc
Row 1: 4 hdc in last FHdc st, hdc in next 6 st, 4 hdc in last st, join. {22}
Row 2: Ch 1, 2 hdc in next st, hdc in next 6 st, (2 hdc in next st, hdc in next st) 3 times, hdc in next 6 st, (2 hdc in next st, hdc in next st) 2 times, join with beginning hdc. {28}
Row 3: hdc in each st around, using back loop only {28}
Row 4: hdc in each st around, join and fasten. {28}

Toe Topper:
Fold slipper in half, sl st in 6th st from front, ch 2, (YO and insert hook in next st, pull through a big loop) 11 times ***all loops should still be on the crochet hook*** YO and pull through all loops, ch 1, fasten securely.

Strap:
Row 1: Sl st in 3rd st from toe topper, hdc in next 12 st, work 5 FHdc, ch 5, sl st in opposite side of strap, fasten.

Sew button to opposite side of strap.

Baby Hat!

I've been making some baby items for some friends and family this holiday season. These tiny items are so quick to make! They come out super cute and are a great gift for anyone with a baby or is expecting.


This hat I made for a friend, I actually haven't sent it out to her yet... so hopefully it'll be a nice surprise!
I used Bernat Softee Baby Yarn: 
I love this baby yarn! It's super soft like the name says!


Download the Printable Pattern


Baby Hat with Flower

To Start Hat:
ch 3 and join with sl st to form a loop
Row 1: Ch 2, make 10 dc in ring, join with sl st in first dc. {10}
Row 2: Ch 2, dc in same st, 2 dc in every st around, join with sl st. {20}
Row 3: Ch 2, (dc in next st, 2 dc in next st) around, join with sl st. {30}
Row 4: Ch 2, (dc in next 2 st, 2 dc in next st) around, join with sl st. {40}
Row 5-10: Ch 2, dc in ever st around, join {40}
Row 11: Ch 2, (dc in next 12 sts, 2dc in next st), join. {43}
Row 12: Ch 1, sc in same st, (skip 2 sts, 5 dc in next st, skip next 2 sts, sc in next st) around, join. Finish.

To Start Flower: ch 7, join with sl st to form ring
Row 1: Ch 1, make 14 dc in ring, join with sl st to in first sc.
Row 2: Ch 1, sc in same sc, (ch 3, sk next sc, sc in next sc) 5 times, ch 3, sk next sc, join {7 ch-3 sp}
Row 3: Join new color with sl st in first ch-3 sp, ch 1, (sc, hdc, 3dc, hdc, sc) in same as joining, (sc, hdc, 3dc, hdc, sc) in each ch-3 sp around {7 petals}
Row 4: Ch 1, working behind petals, sc around post of first sc on round 2, ch 4, (sc around post of next sc on round 2, ch 4) around, join and fasten off. {7 ch-4 sp}
Row 5: Join new color with sl st in first ch-4 sp, ch 1 .(sc, hdc, dc, 2tr, dc, hdc, sc) in same sp as joining, (sc, hdc, dc, 2tc, dc, hdc, sc) in each ch-4 sp around {7 petals}
Row 6: Ch 1, working behind petals, sc around post of first sc on round, ch 5, (sc around post of next sc on round 4, ch 5) around, join and fasten off. {7 ch-5 sp}
Row 7: Join new color with sl st in first ch-5 sp, ch 1, (sc, hdc, 6dc, hdc, sc) in same sp as joining, (sc, hdc, 6dc, hdc, sc) in each ch-5 space around, join and fasten off. {7 petals}
Sew flower to hat.

Wednesday, December 14, 2011

Mary Jane Slippers

Looking for a fancier pair of slippers? How about these Mary Jane Slippers?

Mary-Jane slippers


This pattern can be found at: http://thelittlehousebythesea.wordpress.com/2009/09/03/free-pattern-for-mary-jane-slippers/

I personally haven't made them yet, but when I do i'll be sure to edit this post with pictures!

Slipper Socks

One of the first projects I learned how to make were these slipper socks! They are so warm and super comfortable! They may not be high fashion, but when it comes to having your tootsies be warm... i'll take anything! They are also super easy to make. As a beginner, I whipped a bunch of these out!


This pattern calls for 2 strands of yarn.

You may also use only 1 strand of yarn for a lighter slipper. This works well if you want to alter the pattern to make an even smaller slipper. This all red slipper is made with only 1 strand of yarn.

The pattern includes Men's, Women's and Children sizes.

Download The Printable Pattern


Slipper Socks

Men's: Fits shoe sizes 8-12 - Size J Crochet Hook
Women's: Fits shoe sizes 5-10 - Size I Crochet Hook
Children's: Fits shoe sizes 9-12 - Size I Crochet Hook

NOTES: The instructions are written for children's size with changes for women's and men's in parentheses. All sizes are worked with 2 strands of yarn.

You may also use only 1 strand of yarn for a lighter slipper. This works well if you want to alter the pattern to make an even smaller slipper. This all red slipper is made with only 1 strand of yarn.

Round 1: Ch 2, work 5 sc into 2nd ch from hook to form a circle. Mark last st of this rnd with a pin, then move pin to mark the end of each succeeding rnd.

Round 2: Work 3 sc into each sc around {15}

Round 3: (2 sc in first sc, sc in each of next 2 sc) around {20}

Round 4-16 (18): For men's and women's sizes only, (2 sc in first sc, sc in each of next 3 sc) around {25} Work even on 20 (25-25) sc for 12 (12-14) rnds more. Do not finish off.
Back
Ch 11

Row 1: sc in 2nd ch from hook and in each of the next 9 chs; sc in each of the next 20 (25-25) sc; sc in each ch on opposite side of beg ch; ch 1, turn. {40 (45-45)}

Row 2-9: Sc in back loop of each sc across; ch 1, turn.

Row 10: Sc in each of next 18 (20-20) sc, dec over next 2 sts as follows: draw up a loop in each of the next 2 sts: 3 loops on hook; YO and pull through all 3 loops on hook; work 0 (1-1) sc, dec as before over next 2 sts, sc in each of next 18 (20-20) sc; ch 1, turn.

Row 11: Sc in each of next 17 (19-19) sc, dec over next 2 sts, work 0 (1-1) sc, dec, sc in each of next 17 (19-19) sc; ch 1, turn.

Row 12: Sc in each of next 16 (18-18) sc, dec, work 0 (1-1) sc, dec, sc in each of next 16 (18-18) sc; ch 1, turn.

Finishing: Fold back section in half, carefully matching sts. Sl st inside loops of sides tog. Finish off.
Related Posts Plugin for WordPress, Blogger...