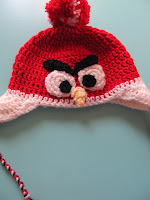
I took a little bit of knowledge and a whole lot of "let's see if this works" and made these!


These however were not the first ones that I've made. The first couple that I made were not as good as I feel the red and black ones are above. Here was it was they looked like at first.


I have learned from my mistakes with these hats. Since playing around with a few different ways, and styles of putting these together, I think it's much better now! I came up with a tutorial for you. I do not have a pattern for this... just the tutorial.
I first started out with just a normal hat pattern. I make an adjustable ring, or you can ch 3 and join with a slst into the first ch to make a loop. I then make 10 dc in the ring to start. Row 2 I dc twice in each dc around, Row 3 I (dc, 2dc) around, Row 4 (dc twice in next dc, dc in next 2 dc) around.... so on and so forth like I had done in the previous hats I had made. Each row will have stitches in multiples of 10.
For my younger nephew, I worked till I had 60 stitches around. For my older nephew, I worked till I had 70 stitches around. I then worked about 5 more rows at same amount of stitches around in the same color. After that I switched to the white yarn, and worked one row with that color.
Now I had to crochet all of the goodies. To make the eye I started again with an adjustable ring and made about 7 or 8 sc in the ring. Then, working the same way you did the hat, row 2 had 2 sc in each st, and row 3 had (2 sc, sc in next) around. Then I finished it off.
For the black part, I started with an adjustable ring and worked about 7 sc in the ring. Then I finished it off. I sewed together these two pieces before attaching them to the hat.
The eyebrows I always seem to do differently for each hat. They do have the same basics. I ch about 13, then in the 9th ch, I do a triple/treble crochet. Sometimes I do another triple/treble and sometimes I skip right down to the double. I do a couple double, a couple half double and a couple single. As long as it gets from triple/treble to single... it really doesn't 100% matter how many you make. You may have to play around and see what looks good.
The only thing is, what you do for one eyebrow, make sure you do the exact same to the other!
The beak is something you should play around with also. I ch 5 or 6 and work with dcs. The next row be sure to dc2tog. Sometimes I do this at both ends, sometimes I do it just in the middle. Work your way down to a point. Depending on the hat size, but I try to do no more than 3 or 4 rows.
For the black bird, I thought this would be very difficult to make. This was my first attempt and it came out just the way I imagined!
Starting with the orange, I made an adjustable ring and made 8 dc in the ring. For row 2, I held the right side {the good looking side} away from me. I then dc once in each st around... however, you have to dc in the front loop only! That is what makes the turn. For the last two rows, I switched to the black yarn and dc in each loop, you can go back to going through both loops.
After you join the last round, make sure your tail is long enough to sew into the hat. I used a crochet needle and sewed each stitch through the hat.
For the red hat, and I would probably do the same for the other colors as well, I ch 15 or so, then made 2 or 3 rows of sc. They will curl up and this is what you are looking for! I made two of them for the red hat shown above, at two different lengths.
If you do not want to venture out to make those, you can always make a puff ball like in the first couple of hats I made. Whatever you choose, it's still cute!
The first couple hats I made, I did not do this step. Which is why some of the eyebrows aren't "angry" enough for my liking! But I took out my pins and pinned each of the pieces onto my hat until they were perfect! Then I sewed them on.
Ta da!! All sewed and looking pretty good! The sewing part takes forever for me, it's the part I hate the most.... but it's totally worth it in the end.
I also didn't do this step for the first few I made, which is why some of the angry bird faces are off when they get on the head of the child I made them for. But now I fold the bird in half after I'm done sewing. I count the stitches and determine how long I want the ear flaps. I place the ear flap directly in the middle. I ch between 10-15 dc for the ear flap. Row 2, I ch 3, then dc2tog, ch until there are 3 st left, dc2tog and then dc to finish the row. I continue that pattern until you only one two left.
Be sure to line up the 2nd ear flap with the first. Do that one the exact same way. If you like looking at patterns better, I do have a pattern for ear flaps for this baby hat. You of course want to make it bigger for bigger hats.
After you are done with the 2nd ear flap, join in a st on the back of the hat, and sc a border around the hat and ear flaps in white.
I then join braided tassels, and it's done!
My nephew also wanted the white dot that is in the middle of the black birds forehead. I made the dot the same way I made the black part of the eye. Just 8 or 9 sc in an adjustable ring.
I hope this tutorial is easy to follow. I'll be honest, they are not the prettiest crocheted angry bird hats out there, but they work! My nephews love them and I have already gotten a lot of compliments on them. My brother has told me that a few people are wondering if I sell them. I think i'll be making more in the future!


No comments:
Post a Comment